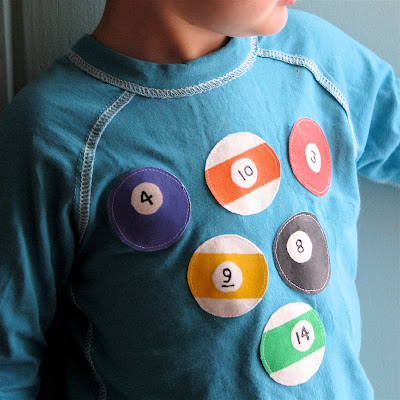
Tutorial by Rae: Billiard Tee
When I saw a t-shirt in a mini-Boden catalog about a year ago that had billiard balls and the caption "Pool Pro," I knew a project like this had to go on My List. But without the cheesy words. Here's my take:
Materials needed:
t-shirt
8" square scrap of white or off-white jersey (or some other smooth knit like interlock, avoid ribbed knits)
double-sided fusible web or interfacing (heat n' bond or steam a seam 2 both work fine)
freezer paper
fabric marking pen
scissors
fabric paints in black, red, green, purple, blue, orange, and yellow
small paint brush (I use the kind that come with kids watercolors)
sewing machine (optional; see note on Step 9)
 |
 |
 |
 |
(left) Heat n' bond lite double sided fusible web, the way it looks when purchased by the yard
(right) Cut out a piece of the double-sided fusible web the exact same size as your white jersey. Iron the bumpy side of the fusible web to the back side of the jersey.
 |
 |
Step 4:
 |
 |
(right) Closeup of the masking tape on one of the balls. Now we're ready to paint!
 |
 |
Step 6:
(left) Fill in the ball outlines with paint, starting with the striped balls. Using a watercolor paintbrush, lightly brush the paint until it solidly fills the entire outline. The masking tape will produce a nice stripe and the little freezer-paper circle will make a hole where the number will go.
(right) Repeat for the next striped ball; I mixed orange and yellow paint to get a schoolbus yellow. Notice that I'm not too concerned about staying in the lines; you'll cut your ball out later so you'll want to make sure you go at least as far as the outline, but it's OK to go over a bit.
 |
 |
(left) The next stripe was orange, and then, because I had put my outlines so close together, I had to peel up the masking tape from the green ball to fill in the solid red ball. Oops!
(right) Filling in the purple and black ball. Note: I mixed this grey-purple shade from black and purple and then ended up not liking it very much, so I used just straight purple paint for the purple ball you see in the final pictures. This grey-purple ball got used to test the stitching later, but it was good that I had drawn an extra outline!
 |
 |
Step 7:
(left) Let your paint dry completely and then peel off the freezer paper circles and masking tape.
(right) Write the numbers in the center of the balls very, very carefully using black paint or a Sharpie. PRACTICE FIRST on a scrap of jersey!!!
 |
 |
Step 8:
(left) Cut out the balls and peel off the paper backing from the fusible web. Position the balls in desired location on tee.
(right) Iron them down. Use a piece of scrap fabric between the iron and the fabric paint so that the fabric paint won't melt and stick to your iron. Ack! That would not be cool.
Note: This next sewing step is optional because honestly don't these look pretty fab just as they are? The fusible web should hold these on during washings so if you're a non-sewist, stopping here could be a good option. Not having tried that, however, I'd recommend sewing them on:
 |
 |
Step 9:
(above) Sew around the outside edges of each ball, about 1/8" from the edge. You don't need to pin, the fusible web will hold them in place. Easy!
(below) Remember that grey-purple ball? I ironed it on to a test scrap of knit and then used it to practice my stitching. It never hurts to do a test run.
Ta-Da! Billiard Tee!
If you make a Billiard Tee, please add it to the Rae Made Me Do It pool or the Celebrate the Boy pool or both!
The Fabricworm Giveaway closes tonight! Click here to win 3 yards of fantastic organic fabric!


