
Little Bit of Color Hoodie How-To
Today I'm going to show you how to make the "Little Bit of Color" Hoodie I posted yesterday, which uses my Flashback Skinny Tee as its starting point. If you're not sure you want to commit to buying the pattern (although it's really really awesome...end shameless promotion), you could use Dana's Basic Tee pattern, which is a classic-fit-tee style, or even trace a tee that you have lying around. This hoodie is pretty simple, so you can really do this with ANY tee pattern!

Array
You will need:
Rib knit, aka ribbing, for the contrast trim (I like 1x1 rib knit because it can be used for tees AND the neckbands, cuffs, trims, etc.)
Your basic tee pieces: front and back + two sleeves
Some knit stay tape (see this post for more info) or fusible interfacing
Snaps / buttons / velcro for the front closure
OK, let's get started!
[1] Cut a strip of your contrast fabric (the rib knit or ribbing) so that it is 2.25" wide for the trim [Where did that number come from? It's 2x the finished width we want (3/4") plus 2x the seam allowance, in this case 3/8"].

Make sure the ribs are perpendicular to the length of the strip. The length you need will depend on how big your hoodie is and how deep you want the opening on the front. One yard is usually long enough though.

Array
[2] Sew the shoulder seams together on your tee.

Array
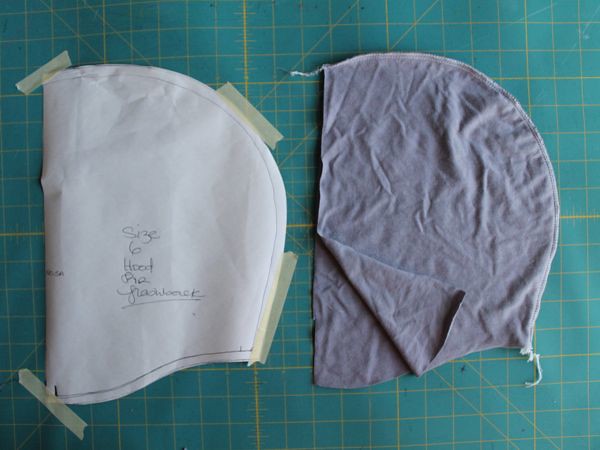
[3] Now you need to trace a hood that fits your kid. Elliot has a couple of sweatshirts (despite his best efforts to lose them at school), so I just traced the best-fitting hood onto paper with a pencil. The bottom was shaped like an "S" so I imitated that curve. Then do a check: take a tape measure and measure along the bottom of the hood from the front edge to the back edge. This should be roughly half the distance around the neck hole. If it's not, add or subtract from the front of the hood until it's the right length. Don't sweat this too much: hoods are pretty forgiving, and knits are stretchy, so you can ease in a bit of difference -- but you want it close, not way off. BUT WAIT! Don't forget to add the seam allowance (3/8") around the back and bottom of the hood!

Array
[4] Cut two hood pieces and sew them together along the back.
Array
[5] Check again that the hood is the right size for your shirt.

Array
I also like to clip a little curve off the top of the center front at this point. In case my hood is too big for the neckline, I can sew the edges down that curve instead of over top of each other.

Array
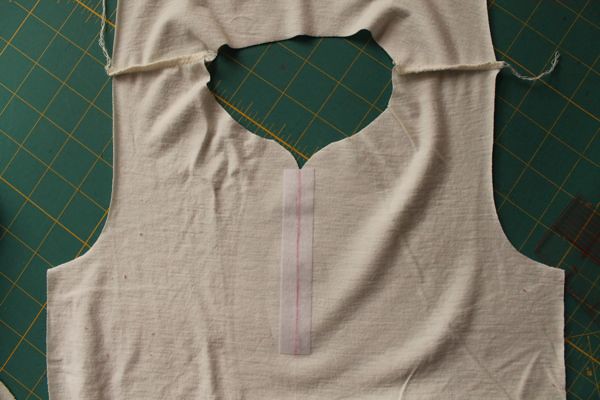
[6] Press a crease in the center front and back of the tee to mark the center, then attach a 4-5" strip of fusible interfacing or knit stay tape down the center line of the tee, on the INSIDE of the tee. Mark the center line with chalk.
Array
[7] Pin the edges of the hood to the neck hole, right sides together; then sew them together.


(I DON'T actually recommend cutting the center open as shown here. Leave that for later [step 9]. But you can trim the edges where the hood meets the center so they are smoother, as shown.)

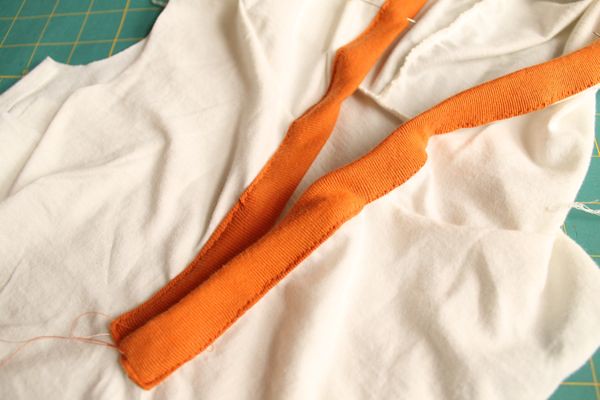
[8] Gently stretch and pin the strip of trim around along the edge of the center line, around the edge of the hood, and back down along the center line, beginning and ending with a fold. The edges of the trim on opposite sides of the center should be even with each other (since you haven't cut the middle open yet).

[9] Sew 3/8" away from the edge of the trim to attach it. Sew with the trim on top. I use a narrow and slightly longer zigzag stitch along with a ballpoint needle. NOW cut carefully down the center, between the edges of the trim.
[10] Press the trim away from the seam. Then press under 3/8" along the opposite side of the contrast trim.

Array
NOT SHOWN BUT REALLY IMPORTANT: At this point it's a really good idea to take a strip of interfacing or stay tape and fuse it to the inside of the trim (on both sides, along the entire front opening) to give your snaps something to hold on to. If you don't do this, your snaps will stretch the trim every time you open them, eventually pulling through your trim and making holes...and you will be very, very sad. I actually had to retro-fit the first (grey) version I made with little pieces of fabric for the snaps to cover up the holes in the fabric they had made. Hey, I learn something new every day. Learn from my mistakes!
[11] Fold the trim over to the outside of the hoodie so that it conceals the stitches you just made. It's really important to make sure the edge *just* conceals the stitches; you need it to overlap nicely at the bottom, so be especially careful there.

Pin it in place, press it (don't skip this!), and stitch it down along the edges. Press the whole shebang again. Pressing is important. Maybe THE most important thing in this tutorial, actually.
[12] Decide which side of the bottom of the opening looks better. Place that side on top. Pin together at the bottom and sew a square through both layers to overlap the bottoms.

[13] Put some snaps on it. If you're brave, sew buttonholes/buttons. Sometimes I sew two buttons on, through both layers, for a faux buttonhole look. The buttons won't work, but they look nice and it's less risky (just check that it will still go over their head before you do this).

[12] Add the sleeves and cuffs as called for in the pattern. Hem the shirt, and you're finished!


Array
One last thing: you can kind of see in the picture above what happened with the first version I made. The trim was too narrow (I only cut it 1.5" wide), so when the snaps went on, they went over the edge of the trim and ripped the tee. Oops! So I had to take them out. This was not easy...it involved two pliers. Then I folded little rectangular flaps of woven fabric around the edge and stitched it down to create a spot for the snaps to hold onto and cover up the holes. Anyway. Like I said, you can always learn something from my mistakes.
Happy Sewing!This post is part of Celebrate the BOY, a series of boy sewing posts hosted by me and Dana of MADE. Here's what we've done so far:
DAY 1: Rae: Saffron Pants and Color Roundup / Dana: 5 Steps to the Basic Tee
DAY 2: Rae: Little Bit of Color Hoodie / Dana: Pants Roundup
DAY 3: Rae: Hoodie Tutorial / Dana: Kids Shorts/Pants with Back Pocket Tutorial
Head over to made to see what Dana's up to! or check out my Celebrate the BOY archives for even more boy sewing posts!