
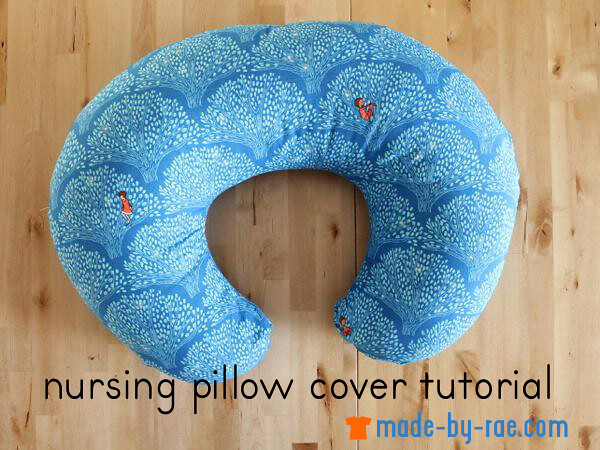
Sewing for baby: Nursing Pillow Cover Tutorial
This nursing pillow cover is a fun and quick sewing project for one of the most useful things I ever had around when my babies were born: the nursing pillow. I kept not one but two of these pillows around because it was nice to have access to one wherever I was in the house, and they were great for propping up the baby for a moment while I folded a load of laundry or ate a bowl of cereal.

Array
In this tutorial, I’ll show you how to trace a nursing pillow cover you already own to make a new one, or you can download and print out my free pattern out at home and use that instead. This cover was made with a lovely cotton designed by Sarah Jane from her “Wee Wander” line for Michael Miller and it’s perfect for my spring baby! You could also try flannel or fleece for the colder months. And remember: if you make at least two, you’ll always have a backup when the other one is in the wash!
wee wander blog tour logo blog
This post is part of the Wee Wander blog tour hosted by my friend Sarah Jane, the designer of the Wee Wander fabric shown in this post. For more fun tutorials using the Wee Wander fabric line, check out the rest of the tour! Just a note: I received the fabric for this pillow for free, but I did not receive any additional compensation for this post, just happy to play along!!
You will need:
1 1/2 yards of 44″ width fabric
22″ inch zipper
Step 1: Cut out the pieces
Print out my free Nursing Pillow Cover Pattern (click to download and print at 100%, then tape together and cut out the pattern pieces). Fold your fabric in half with the selvages together and cut out one of each piece on the fold: UPPER BACK, LOWER BACK. Then tape the pattern pieces together along the dashed line and cut out one FRONT on the fold.

Array
Don’t want to bother with the printer? Have a nursing pillow that is older or a slightly different brand or shape? Make your own pattern! Here’s how:

Array
Fold your nursing pillow cover in half and trace around the outside with a pen or pencil. Use a ruler to make the folded edge perfectly straight. Now add 1/2″ to the curved edges only for a seam allowance.

Array
Cut out the FRONT of the pillow first (top two pics). Now take a ruler and cut straight across the upper part of the pattern piece. Now cut out an UPPER BACK and LOWER BACK, but add 1/2″ to both of the cut edges of the pattern pieces for the zipper seam allowance.
Step 2: Attach two back pieces together
Pin the UPPER BACK and LOWER BACK pieces together along the straight edge with their right sides together. Place the zipper over them and mark where the zipper begins and ends (you want the metal parts of the zipper, not the ends of the zipper tape).

Array
SEW the two pieces together between the ends of the pillow and the zipper marks, but BASTE between the two zipper marks as shown. Be sure to stitch back and forth at the zipper marks a few times to secure the stitches. Press the seam allowances apart.

Array
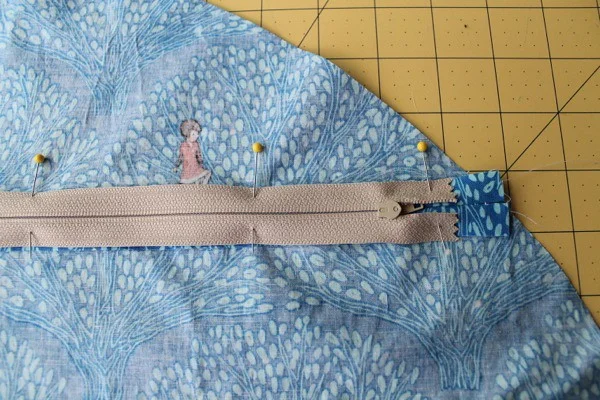
Step 3: Attach the zipper
Place the zipper face down over the seam allowances as shown and pin in place.

Array
Array

Array
Sew the zipper to the cover using a zipper foot as shown. I like to sew right down the middle of the zipper tape (you may need to put the needle down, lift the presser foot, and move the zipper head if it gets in the way), across the ends (be careful not to sew over the metal parts of the zipper!!!!), and back up the other side.
Use a seam ripper to pull out the basting stitches, then open the zipper a few inches (IMPORTANT! DO NOT FORGET TO OPEN THE ZIPPER!)

Array

Array

Array
Step 4: Sew FRONT and BACK together
Pin front and back together with right sides facing. Sew around the entire outside edge of the pillow with a 1/2″ seam.

Array

Array
Finish the seams with a pinking shears or serger, turn right-side out through the zipper opening, and put it on your nursing pillow!

Array
Ta-da!! Wasn’t that fun?
Array
For more fun tutorials using the Wee Wander fabric line, check out the rest of the Wee Wander blog tour! You can also find more baby tutorials over on my tutorial page. Thanks for inviting me to participate, Sarah!!!