
Josephine with Tassel Ties

Josephine Top with Tassel Ties
How long have you been reading this blog? Long enough to remember how much I love a good bit of pattern improv? Maybe you love it too! The desire to mix it up (constantly) is really what drives me to create patterns that are not only distinct, but work well as blank templates. I just love a pattern I can make over and over again yet never end up with the same thing twice. At first glance the Josephine Sewing Pattern might not seem like a great blank template, being limited in some ways by the pleating detail on the front which lends it a very distinct look and feel, but as soon as you lose the tucks on the front it turns into an entirely different animal.
Josephine Top with Tassel Ties

Josephine Top with Tassel Ties
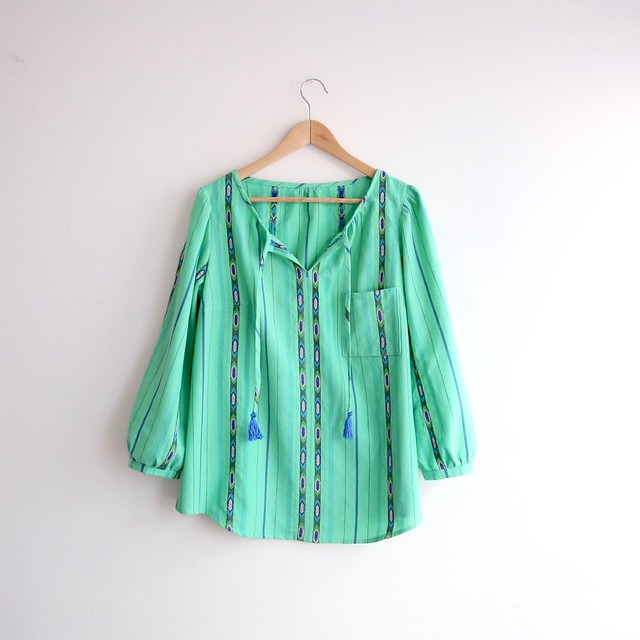
For this blouse, I dropped the hemline in the center to create a shirt-tail hem, like Beatrix or Gemma, extended the bias binding to create ties and added tassels, and gathered the neckline instead of pleating the bodice. The result is a silhouette with more ease (3″ more, in fact) than the original pattern and an overall look that’s quite on-trend, especially in this dreamy Loominous fabric designed by Anna Maria Horner.

Josephine Top with Tassel Ties

Josephine Top with Tassel Ties

Josephine Top with Tassel Ties
Here’s how to modify the Josephine Pattern to get this version!
How-to: Josephine with Tassel Ties
Cut out the A/B bodice using the View C cutting lines (unless you are extremely busty you won’t need the C/D bodice. Skipping the tucks creates additional ease, so even if you’re pretty large-busted, there will be enough ease in the pattern that you won’t need the larger cup size. Check the finished measurement chart and then add 3″ to the FM for bust if you’re not sure!).
Drop the center of the hem a few inches when cutting out the pattern to create a shirt-tail shape. Draw an S shape with chalk before cutting, remembering that the hem line needs to intersect center front and sides at a right angle.
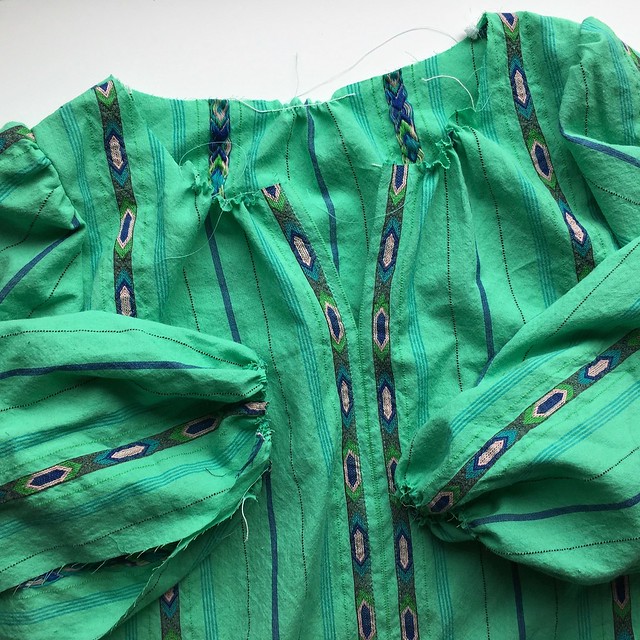
Gather the neckline edge along the pleated areas with elastic thread (see my shirring tutorial) or with basting stitches. I also gathered a couple inches in the back as well. See photo below:
Josephine Top with Tassel Ties
Follow the instructions for View C, but add the sleeves as if you were making View B. I also used elastic thread to gather the sleeve caps and ends of the sleeves…it’s just SO. QUICK. !!!

Josephine Top with Tassel Ties
After sewing the center seam, press and fold under, then stitch down the edges of the center front extension, since the edges won’t get enclosed by the tucks like they usually are.
When binding the neckline, extend the bias binding past the center front edges to create ties, then stitch it shut and add a couple tassels to the ends (I like Liesl’s tassel tutorial over at Creativebug. I used DMC embroidery floss for these)
And that’s it! Wear and enjoy!

Josephine Top with Tassel Ties

Josephine Top with Tassel Ties
Please let me know if you try this version of Josephine. I’d love to see how yours turns out!
For even more Josephine variations, check out the Josephine page. You might also like this version with with release tucks, or this one with release tucks and sleeves!