
How to crop the Gemma tank

How to make a cropped Gemma Tank / made by rae sewing patterns
As promised, and just in time for some fun weekend sewing, here’s a tutorial to show you how to turn your Gemma tank into a cropped tank, as seen in Jess’ fantastically popular Cleo / Gemma outfit in this post. I’ve included an original Gemma tank in the pic above at right so you can see the difference between the original tank and the cropped version. If you need the pattern, you can buy it in my shop.
The best way to figure out how much to crop off the bottom of the pattern is to make an original Gemma (or at the very least, a muslin) first, so you can make sure you have the right size and bust size. Gemma comes with both an A/B and C/D front bodice piece for each of its nine women’s sizes. Once you’re happy you have the right size, you can use your pattern tracings to make new modified pattern pieces (Not sure how to trace a pattern? Check out this great tutorial where we show you how to trace a pattern!) . Try your Gemma on and determine how long you would like the cropped version to be.
You will need:
The Gemma tank sewing pattern, traced in your size
Straight edge and pencil (clear quilter’s ruler is helpful)
Additional Swedish tracing paper (see this post for sourcing STP)
How to crop the Gemma pattern
Step 1. Decide how long you want your cropped version to be
Try your Gemma (or Gemma muslin) on and determine how long you would like the cropped version to be. Measure down the side seam from the armpit to where you'd like your cropped hem to land. You may find it helpful to fold under the hem of your Gemma to visualize what it would look like cropped, mark this distance at the side seam with chalk, and then measure the distance.
Step 2. Draw the new hemline on your pattern
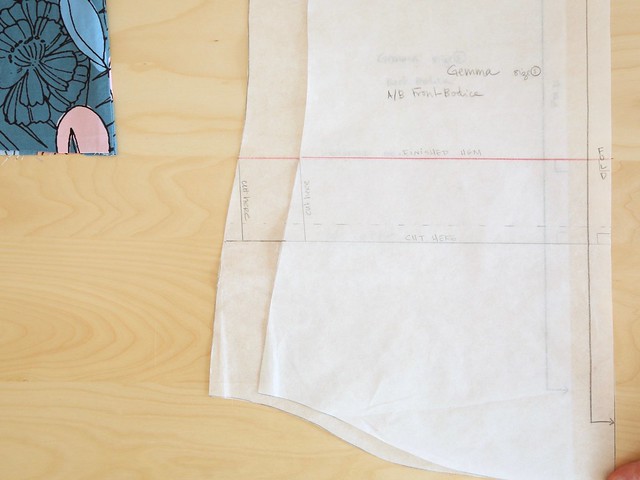
Measure this distance from the armpit along the side seam of the BACK BODICE pattern piece and make a mark. Then use your straight edge to draw a line perpendicular to the fold line ("finished hem," shown in red). We measured down 7 1/2" inches from the armpit for this version. This is quite short, so you may want to start with 8-1o inches instead just to be on the safe side, especially if you have a long torso. Remember that you can always trim it shorter, but you can't add length once you've cut it.
Step 3. Add a hem allowance
Draw a cutting line parallel to the finished hem and label it "cut here." The distance between your two lines will be your hem allowance. In this case, I added 2 1/2" so that I could fold the bottom edge up 1/2" first, and then another 2" for a nice wide hem. A wider hem allowance also gives you a little more flexibility to try it on and get the length just right! This will be where you cut your fabric when cutting your cropped tank (see tank in photo, left).
Step 4. Straighten the side seam along the hem allowance
Draw a vertical line between your two horizontal lines at the side seam. Cutting your fabric along this line will straighten the side seam and make it easier to fold up the hem allowance when you're hemming the tank. Bonus points if you can get your line to mirror the angle above the hemline.

How to make a cropped Gemma
Note that both of your horizontal lines should hit the center of the pattern at 90 degrees; it helps to use a clear quilter's ruler when drawing them to insure that this is the case.

How to make a cropped Gemma
Step 5. Transfer hem and cutting lines to front bodice
Now put your front and back bodice together, matching them up at the bottom and sides (not at the top! the front bodice has a dart that adds extra length to the side seam above the lines you drew), and transfer your lines to the front bodice just as you did for the back bodice.

How to make a cropped Gemma
And again, make sure they intersect center front at a 90 degree angle:
How to make a cropped Gemma
Step 6. Cut out your tank
Now you're ready to use your pattern pieces to cut out a front and a back from your fabric as shown in the instructions. I find it works well the first time to fold under the pattern piece at the "cut here" lines to try them out. Once you are happy that you've gotten the right cropped length, make a new tracing of the pattern with crop lines so that you can use that one for your cropped versions moving forward.
Step 7. Sew it together
You'll sew the tank together as instructed in the pattern, but note that to hem this version of Gemma, you'll fold and press 1/2" and then another 2" (or whatever hem allowance you chose) toward the wrong side along the bottom of the tank, and then stitch along the first fold.
I can't wait to see your cropped Gemma tanks! Please use the #gemmatank and #raemademedoit tags on social media to share your creations. Happy sewing, everyone!