
Hemming KNITS: 6 ways to beat those pesky puckers
I am really truly excited that so many of you are commenting to say that the KNITerviews have inspired you to get over yourself and try sewing with knits! I wanted to offer a few more posts about sewing with knits to help you S T R E T C H yourself (haha, GET IT??) and try it out. While I think it's great to jump in and try new things, it's realistic to expect a few bumps along the way. And while I strongly believe that mistakes are required if you want to learn, I also don't want anyone to crash and burn! So I thought I'd offer a few tidbits of my own that might make sewing with knits easier for you.

Array
I think one of the hardest things about sewing knits is puckery hems. Almost 100% of the time you are sewing with knits you are sewing garments. And there's nothing worse than getting to the very last step (the hemming) and finding that your fabric just won't hem without stretching and puckering. The problem is worst when sewing perpendicular to the grain, which is why hemming is often a source of frustration when it comes to sewing knits (but puckering can also happen anywhere: on the shoulder seams, on the arm curves, around the neck).So here are SIX ways that I've found to beat the puckery hem:
Array
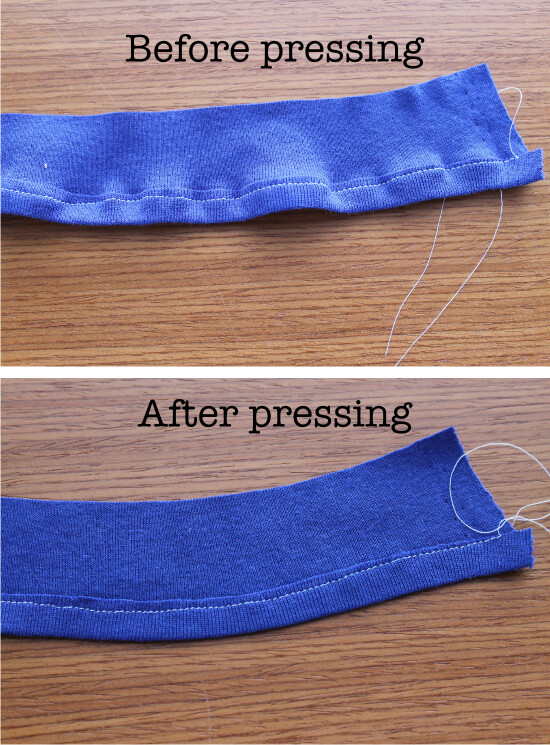
1. PRESS IT! aka The Iron Is Your Friend - this is a really good rule, for any type of sewing, really: when things look grim, press it before you toss it.PROS: If you don't own an iron, then you really shouldn't be sewing. So that sounds really extreme, but I keep trying to find a better way to say it than that, and I really can't. It's like biking without a helmet. Or skydiving without a parachute (?). OK, maybe not quite like that...but you get my point. Pressing is REALLY REALLY REALLY important.CONS: Pressing does not fix everything, just alotathings. For example, you can see in the photo (above) that while the iron may make the seam flatter, it can't always un-stretch it. But it's worth a try, right?
Array
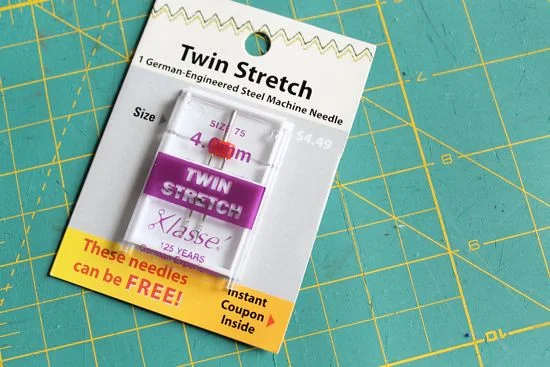
2. Double needle - I JUST tried this out for the first time a couple weeks ago (after reading Katy's tute, in fact) and my double needle is my new BFF. No jokes.PROS: Easy to use on almost any sewing machine, makes a neat professional looking seam which stretches nicely due to the zig-zag on the back side.CONS: You can't sew with the wrong side on top because the bobbin side makes the zig-zag (this makes it a little trickier to sew a hem) and, depending on the type of knit you are using, you may get some skipped stitches. I found that using a different size needle helped, Katy suggests that you try moving your needle position over a bit, and Sascha mentions (in her KNITerview) that increasing the stitch length can also help. So a little trouble-shooting may be needed.

Array
3. Knit Stay Tape - do you know about this stuff? It's got iron-on adhesive on one side and is stretchy like knit, so you can attach it to the hem of a shirt and it helps it keep it's shape when you hem it up (The stuff I like is called SewkeysE; I buy mine at Material Girls in Dearborn, they also have it online). "Knit interfacing" is similar, widely available and is useful for wider hems as it's stretchy, fusible, and lightweight.PROS: A little extra time at the iron, a lot less frustration at the machine.CONS: Hard to find, a little pricey, doesn't completely eliminate that "stretched-out" look, especially on super-stretchy knits

Array
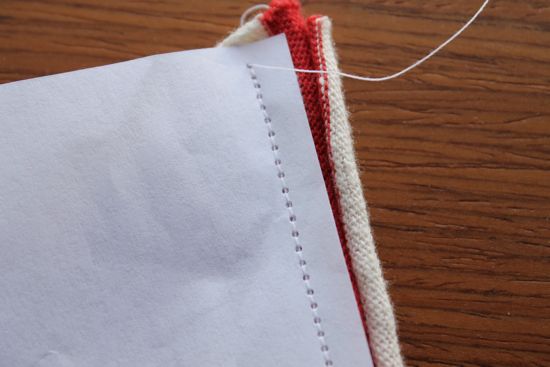
4. The paper trick - I had a really crappy machine back in college (you know, a $120 Singer made almost completely out of plastic, even the insides) that used to always suck knits down into the bobbin case and mangle them. So when I wanted to sew knits I used to use this trick: Place a piece of paper between the fabric and the presser foot, and then go ahead and sew your seam.

Array
The needle will make a perforation in the paper, so shorter stitch length is best.
Array
When you're finished, bend the paper along the stitch line, then tear the paper away from both sides to reveal -- TA-DA! -- a nice even seam.

Array
Not only does this help your seam look nice and flat, it prevents the fabric from getting sucked down into your machine and mangled (used to be a source of much frustration for me).PROS: Everyone has paper, right?CONS: Straight stitches break when stretched, so this might not be best for hems that see a ton of wear/stretching. I could see using it to hem a wide-leg jersey pant though! Also: thin paper doesn't work as well as thick because it doesn't tear away as easily and can get stuck under the stitches.
Array
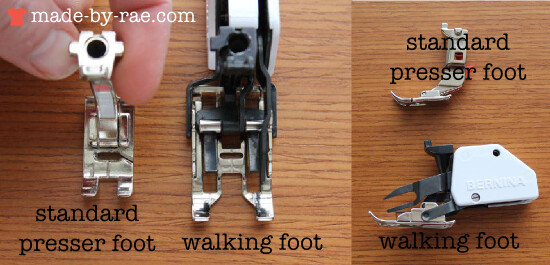
5. Walking foot - The walking foot adds less pressure to the fabric, which helps move it through the machine with less stretching. I've just made a little video demonstrating my walking foot that I'll post soon where I make a complete fool of myself. Whee!PROS: In combination with the double needle, this has become my current go-to way to hem knits. If the universal walking foot works on your machine, there could be just $10 between you and hemming happiness!CONS: On my machine these are especially expensive (Bernina Activa 220). I had to save up for mine. No joke.

Array
6: Add a cuff - It's a cheat, really, but one of my favorite ways to finish the sleeve or waistband of a shirt or the hem of a knit pant is to add a folded cuff (aka a "waistband" if it's on the hem of a shirt, but the concept is still the same). The idea is that you take a strip of fabric that's slightly smaller than the edge you want to finish (the end of a sleeve, for example), sew the ends together and fold it in half. Then you place it on the outside of the garment and sew all three edges together (two from the cuff/waistband, one from the garment). Then you flip the cuff or waistband away from the garment so the seam is no longer visible. Voila, beautiful finish!PROS: Easy finish with NO visible seamsCONS: Well you can't put a cuff on everything.
Array
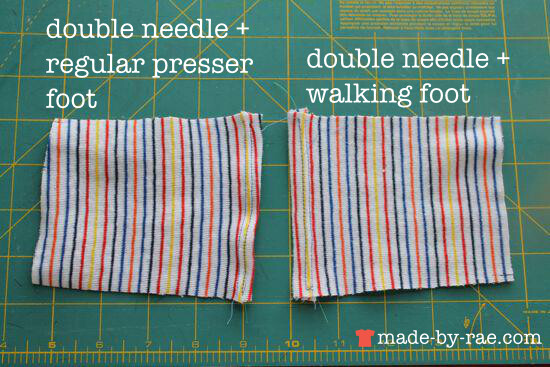
And then of course, there's the possibility of combining any of these things. My current favorite way to hem my skinny tees is my "triple threat" approach: pressing + walking foot + double needle. As you can see in the closeup below, the combination of double needle + walking foot is pretty nifty:

Array
And here's another example. Can you tell which one used the walking foot?

Array
Are you ready to STRETCH YOURSELF and sew with knits? I hope so!!!!