
Converting Trillium to a nursing top

Please note: The pattern previously known as “Washi” has been renamed “Trillium.” Read about the name change here. It’s the same lovely pattern, just with a new name!
Over here at MBR Labs, I’ve been working on hacking the Trillium Dress pattern so that it works as a nursing top! I’ve had plenty of requests for this since the original pattern was released, but I really wanted to wait until the Washi Expansion Pack came because I knew the front center seam on the bow versions would be PERFECT for adding a zipper or buttons or something to the bodice (please note that the Washi Expansion Pack has not been updated, and does not include the extended size range that Trillium now has. However, the instructions in this post include tips on adjusting the bodice). What can I say, I lurrrrve the bow. I think it looks really great.


I was also surprised to discover that these tops actually fit over my belly, even at 36 weeks of pregnancy, though if you want Trillium to fit throughout the entire pregnancy, I'd definitely recommend cutting the skirt pieces a few inches wider along the "dress" line instead of the "top" line as I could have used just a few more inches in that region. Of course the intention was not really to make a maternity top, so it's not a big deal...just thought I'd mention it.

I'm so pregnant I don't even edit out my weird expressions anymore. Vanity has gone OUT THE WINDOW. You're welcome.

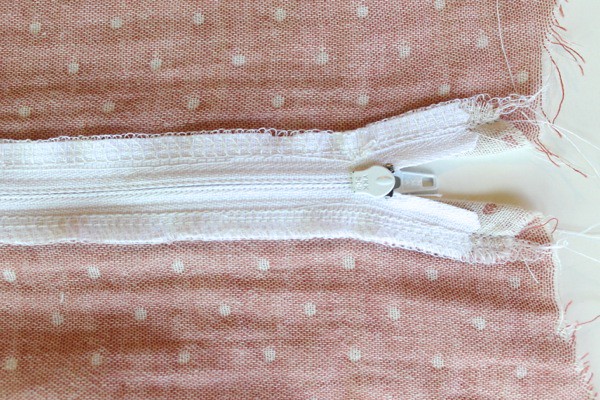
For these two versions, I tried two different kinds of zippers. On this reversible double gauze version I put in a regular old zipper:

And on this voile version there is an invisible zipper.

Pretty nice eh? I definitely like the invisible zip better as far as overall look, but I'll give you a quick step-by-step for both.
Just a few things before we start:
I used 9" and 14" zippers and just trimmed the bottom of the zipper to be even with the bodice, but I think a 7" zipper might work too.
The “Bow Bodice” pattern pieces I used in this tutorial can be found in the Washi Expansion pack, but you could also just add 1/2″ to the center fold line on the original Trillium bodice piece, and cut two instead of one on the fold to create a front center seam. The “dot” on the pattern piece is 1.5″ below the top.
You may also want to go up a size on the bodice piece from your normal size, as you may need more room in front when you are nursing!
When I make the bow tops, I also like to scoop out the bottom of the front neckline 1" and lower the dot accordingly, so I did that before I started. Personally I think it looks nicer when the neckline is a bit lower with the bow, but it hits everyone in a different place depending on how you're built, so...maybe hold it up to your body before you start trimming away.
One last thing I did differently for both of these bodices was leave the fabric inside the darts (instead of cutting out the "V" shape from the middle of the darts) because with double gauze and voile, the fabric tends to fray and I didn't want to leave those dart seam allowances as short as the pattern calls for. You can see this in the first photo below.
Let's start with the regular zipper!
ADDING A ZIPPER TO TRILLIUM

Step 1: Baste the two front bow bodice pieces* together along the front center seam as directed in the pattern from bottom to the dot and trim the seam allowance to the width of your zipper (most standard zips are 1/2" wide on each side, so I trimmed the seam allowance to 1/2").

Step 2: Place the closed zipper face down towards the basted center front seam, so that the teeth are directly over the seam, and pin in place (or use Wonder Tape to hold your zipper in place). The head of the zipper should be right where the top of the center seam ends. Sew each side of the zipper tape right down the center using a zipper foot (put the needle down and slide the head of the zipper around when you start to get close to it, to keep it out of the way of the presser foot). When you get to the bottom of the bodice, sew across the teeth back and forth a few times so that the zipper head won't fall off the zipper when you trim the bottom of the zipper away. From the front it should now look like this:

Step 3: Remove the basting stitches with a seam ripper from the outside of the bodice. Then finish the seam by either serging the edge of the zipper tape to the edge of the seam allowance on both sides (shown), or zig zag stitching or overlocking the edges together on a regular sewing machine. This is especially important if you have a fabric that frays easily!
Next step is to trim the bottom of the zipper off so that it's even with the bottom of the bodice, and then continue to construct the top as instructed in the pattern. Sew the darts, pleat the front skirt, etc, just as you would if you were using the normal bodice. You'll notice that the front center seam will need to be pressed down instead of up, but that's really the only difference!
ADDING AN INVISIBLE ZIPPER TO TRILLIUM
For this version, you may want to refer to Colette’s Invisible Zipper tutorial or Invisible Zip Video; I found it helpful. And honestly I didn’t include a ton of detail here, so you probably will too!

Step 1: With the tip of your iron, press the zipper teeth away from the zipper tape. This will make it easier to sew because the teeth usually curl around the tape a bit.

Step 2: Open the zipper. With the bodice piece face up and the zipper face down, pin one side of the zipper to its corresponding bodice front, with the zipper teeth where the seam will be. I started with the right side of the zipper and the right bodice piece. See how it looks kind of backwards in the photo? Just trust me on this one. I pressed a crease where the front center seam would be before I started to help me visualize where the zipper teeth should go, but you could also draw it in with a marking pen.
Again, align the top of the zipper so that when it's closed, the head of the zipper will be where the dot is on the pattern piece.
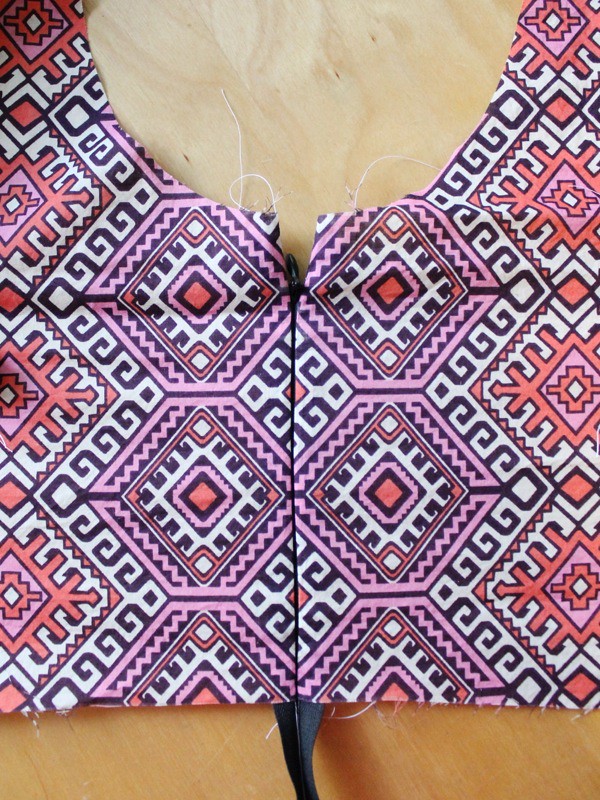
Step 3: Now sew the zipper and bodice together (still with the zipper open), stitching right next to the zipper teeth. I use a regular presser foot for this, but if you have an invisible zipper foot for your machine, that will work too. Then pin the other side of the zipper to the other bodice piece, and repeat what you just did. Sew across the bottom of the bodice a few times to create a stop for the zipper head.

In the two photos here (above and below) you can see what it should look like after you've sewn both sides (the zipper is closed now). See the little white threads sticking out at the top and bottom in the photo above? You can't see the stitches because they're RIGHT next to the teeth, but they're there!
Step 4: Now construct the rest of the top as instructed. As you can see I waited to trim the zipper off until after I attached the bodice to the front skirt.

So there you go! Let me know how it turns out for you if you try it.
One last thing: if you fear sewing the zipper you could also try adding a couple extra inches to the front center seam allowances and folding them over to make an overlapping button placket type thingy; I've seen this done a few times successfully, so that may also be worth a try. Have fun!!!
