
Bias Binding Tutorial (french method)
bias binding french
This is the third and final tutorial in my bias binding series. Many of my women's sewing patterns, including the Gemma tank shown in this post, use bias binding to finish the neckline and armholes. There are so many ways to attach bias binding! Here are the methods I have shared so far:
Traditional Method - my preferred technique and found in the sewing instructions for Gemma, Ruby, and Josephine
Topstitch Method - another great technique, easier than traditional, and the reverse of traditional
This third tutorial will show you another fantastic bias binding technique called the "french method," which creates a lovely invisible finish. This involves folding the bias binding in half, attaching it to the outside of the garment, flipping it completely to the inside, and stitching it down from the inside. This method is wonderful because you won't see the binding at all when it's finished, which can look very sharp and professional!
You will need:
1.25" wide bias binding* (see my handy tutorial to make your own)
a garment with an unfinished neckline and/or armholes
iron + ironing surface
(optional) clear quilter's ruler
your sewing machine
*also called bias tape or bias strips
Before you begin:
Since this method involves folding the seam allowance and bias binding all the way to the inside of the garment, the armholes and neckline will end up 1/4" wider, and the shoulders 1/2" narrower than they would using the other binding methods. If you're ok with those changes, proceed to Step 1. If you'd rather preserve the same proportions, add 1/4" seam allowance to your pattern pieces along all the neck and armhole lines. Do this by marking dots 1/4" away from the pattern piece edges, then connecting the dots to make a new cutting line. This is shown in red on the front and back pattern pieces of Gemma here:
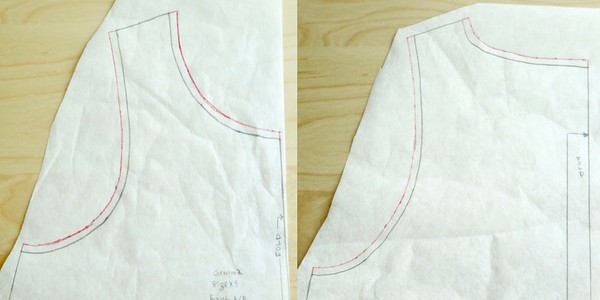
add seam allowance
Step 1. Press binding in half lengthwise
Using your iron, press the bias binding in half lengthwise with wrong sides facing.
Step 2. Make sure you have enough
Place binding loosely around the neckline and armholes before pinning. Since the binding will not be visible from the outside, it is not essential to make sure the seams in the binding are strategically placed.
Step 3. Staystitch
If you haven’t already, staystitch the neckline and armholes. Use a regular stitch to sew around the openings 1/8″ away from the edge. This will prevent the edges from stretching out when you add the binding.
Step 4. Pin binding to neckline/armhole
Instead of overlapping the ends of the bias binding as in the other tutorials, I'm going to show you how to sew the two ends of the bias binding together before sewing it to the neckline. This results in an even smoother finish. With garment right side out, pin binding to neckline with raw edges aligned. Begin 1/2" before one shoulder seam.

Made By Rae | French Binding Tutorial
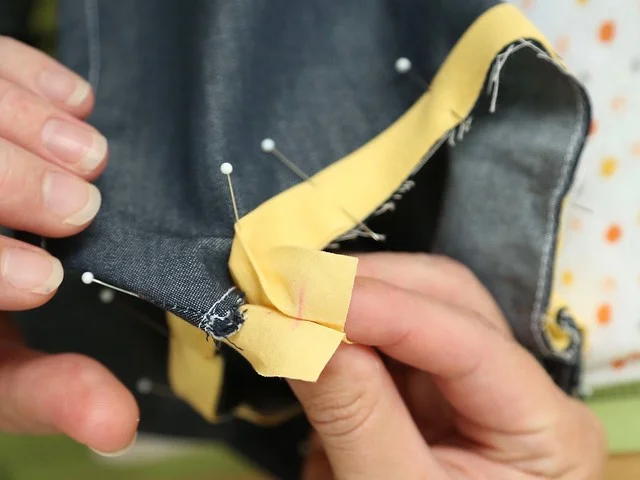
Pin all the way around, and allow the end of the bias binding to extend past the starting shoulder seam. With chalk or disappearing fabric marker, mark both ends of the bias binding at the shoulder seam line.

Made By Rae | French Binding Tutorial
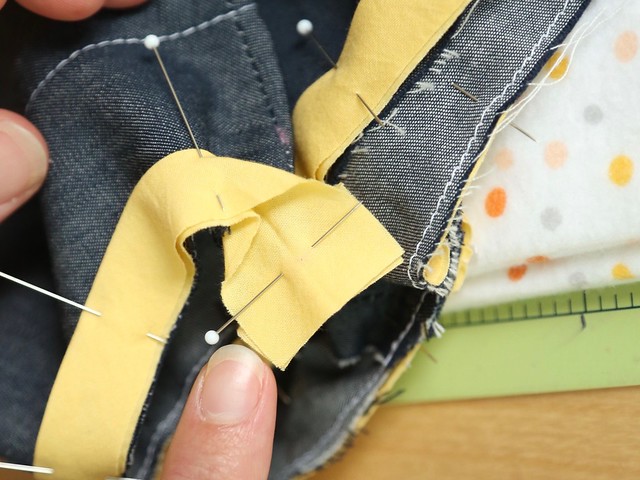
Trim the end of the bias binding 1/2" past the shoulder seam. If necessary, remove the pins on either side of the shoulder seam. Unfold the ends of the bias binding and pin them with right sides together and seam marks facing.
Made By Rae | French Binding Tutorial

Made By Rae | French Binding Tutorial
Made By Rae | French Binding Tutorial
Stitch the two ends together with a 1/2" seam allowance.

Made By Rae | French Binding Tutorial
Open up the seam you just made and finger press to smooth.

Made By Rae | French Binding Tutorial
Fold the binding back in half and pin to neckline. See how the seam lines right up with the shoulder?

Made By Rae | French Binding Tutorial
Step 5. Press in place
It helps to give your bindings a quick press after pinning to encourage them to curve along the neck or armhole opening.

Made By Rae | French Binding Tutorial
Step 6. Sew!
Sew the binding to the neckline using a scant (that means just a hair under) 1/4″ seam allowance. For my machine, this is not the same as where the edge of my presser foot is, so I have to keep a close eye on the marks on the throatplate to make sure I don’t go over 1/4”. It’s really important to go slow, keep the edges even, and not go over 1/4".

Made By Rae | French Binding Tutorial
Continue sewing around the entire neckline or armhole.

made by rae french binding
Step 7. Press binding to inside of garment.
Press binding up, away from garment (not shown).Flip binding all the way to the inside of the garment and press, allowing the the outer fabric to roll slightly to the inside for a nice clean look. With the 1.25"-wide bias tape folded in half as shown, the binding should be sufficiently wide to cover the seam allowance. If you're using narrower bias tape, or have trouble hiding the seam allowance, you may need to grade the seam allowances to 1/8" before pressing.

Made By Rae | French Binding Tutorial
Step 8. Pin binding to inside of garment
Turn the garment inside out and pin the binding all the way around. If you'd like to add a tag to the back of your neckline, now is the time to pin it into place.
Tip: Pin with the pins pointing clockwise; this will make it easy to pull them out as you sew!

Made By Rae | French Binding Tutorial
Step 9. Edgestitch
Stitching from the inside of the garment and removing the pins carefully as you sew, sew along the folded edge of the binding.

Made By Rae | French Binding Tutorial
Step 10. Press
Give your binding a final press, step back, and admire!

Made By Rae | French Binding Tutorial
A note about thread color:
I used white thread for this tutorial so that you can see the progress of each step. Choose a thread that matches the garment to make this method's stitches virtually invisible.

made by rae | french bias binding
Want to see another example of this method in action? Check out Jess' Rayon Gemma top; it looks amazing!

bias binding tutorials made by rae