Rae pretends she can quilt (and shares a quick quilting tutorial)
Disclaimer: I am not a Real Quilter. I have never taken a quilting class before, nor do I have any other kind of training in the quilting department besides that which my mother dispensed in the rare moments I actually listened to her. I certainly did more eye rolling than listening as a general rule, so what sewing knowledge I was able to get through my stubborn head can only be attributed to her, not me, and is laudable indeed.
With that said, I like to make quilts because I have found them to be pretty intuitive on their own. With very little expertise one can produce a very satisfying end product. Add to that the fact that they are quite simply the best way one can use multiple fabric prints or colors in one place. I especially like to make baby quilts because they are small and quick and double as play blankets as well as bedding.
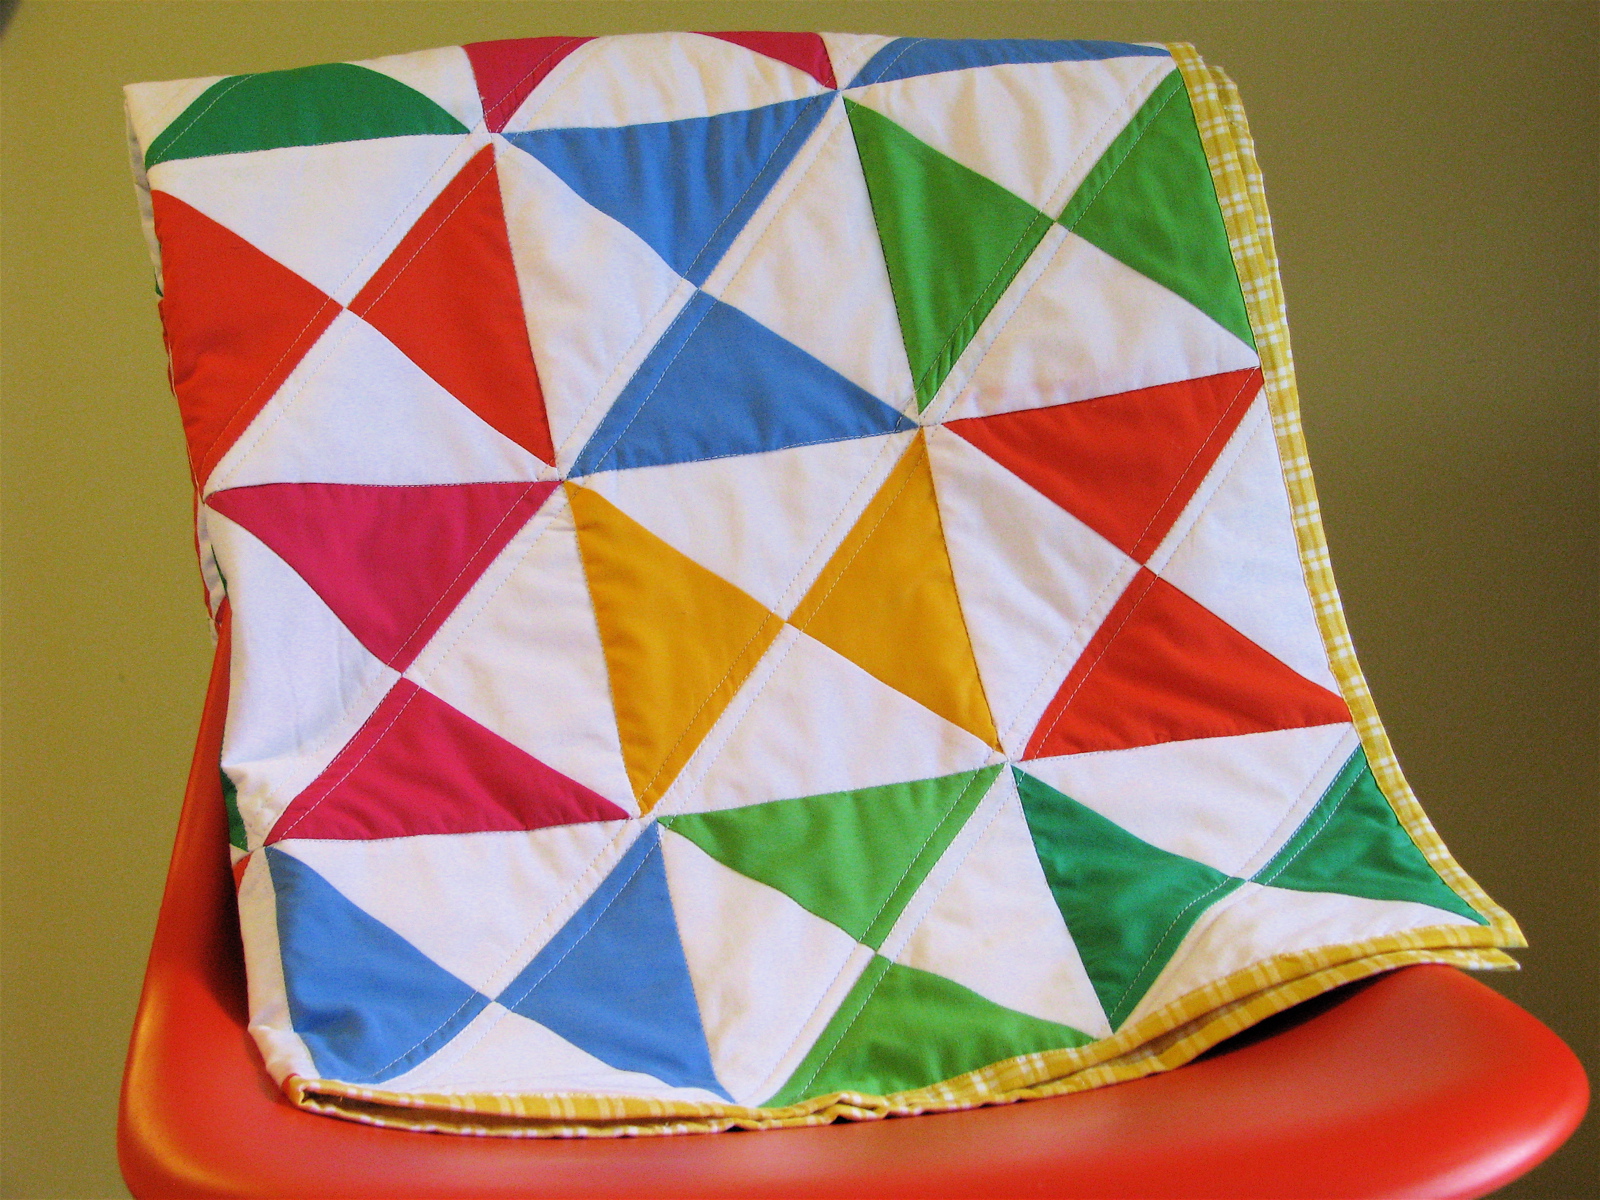
So despite the fact that I am a complete Quilting Imposter, I managed to pull together a tutorial for a baby quilt that is quite nice over at Sew Mama Sew. It’s up today so you can head over there to see it: Crayon Box Quilt Tutorial. This quilt is very similar to the one I made for Clementine last year although hers was 6×7 squares and this one is 6×6.
If you follow Sew Mama Sew at all, you’ll know that many amazing quilters have contributed their expertise in the form of Sew Mama Sew Tutorials. They include but are certainly not limited to: Elizabeth of Oh Fransson!, Alissa of Handmade By Alissa (and founder of Modern Quilt Guild), and Ashley from Film in the Fridge (who I had the pleasure to meet this summer in Vermont!). If you have time you should visit their blogs. They are Real Quilters and I have learned oodles from them and I am sure you will too.
I think the perspective I can offer as a completely untrained quilter is that there are ways to “cheat” (or as Amy Karol would say, “bend the rules”) when it comes to quilting. These cheats don’t result in award-winning heirloom quilts but for small projects like this one (that will probably get beaten up anyway), I’m quite sure it doesn’t matter. Plus it makes me love quilting just a little bit more when I can make a nice-looking quilt quickly without toiling over it for eons.
So in addition to the tutorial, I wanted to share another trick I use to bend the rules here on the blog, which is that I bind my quilts using the backing instead of making separate binding. I’m sure this has all Real Quilters Gone Before rolling over in their graves, but it makes me feel pretty smug/clever. Here’s a quick tutorial:
This is a tutorial to show you how to use the fabric on the back of a quilt to bind it off. Most quilts have a separate strip of binding that goes around the outside of the quilt. Here I’ll show you how to take the backing and fold it over the edge of the quilt to finish it. This works best for small baby or doll quilts.
Note: the Crayon Box Quilt Tutorial for the quilt top shown in the instruction photos below was first posted over at Sew Mama Sew. The quilt pictured above is the Storytime Squares Quilt which is available as a free pattern download/tutorial on my blog.
Step 1: After quilting the layers of your quilt together, trim the batting along the outside of the quilt right to the edge of the quilt top.
Step 2: Trim backing (the yellow plaid fabric in my photos) to ONE INCH all the way around the quilt.
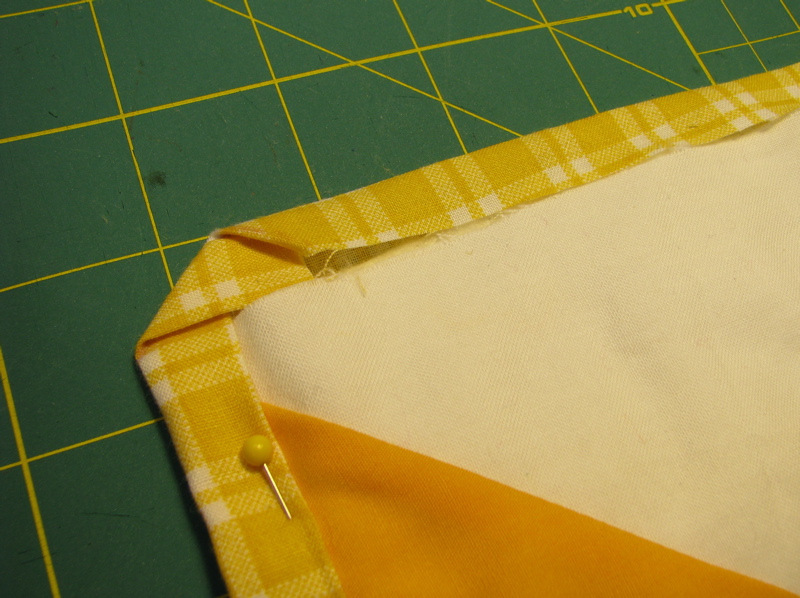
Step 3: Starting near a corner and working clockwise around the quilt, fold the backing in half so that its raw edge is lined up with the edge of the quilt top (it will now be 1/2″ wide). In the photo below, I have folded the edge on the left:
Step 4: Fold backing one more time along the edge of the quilt top so that it overlaps the quilt top by 1/2″. Pin in place.
Step 5: Mark a diagonal line at the corner. The base of the line should start where the corner of the quilt top is (under the backing) and end 1″ from the corner along the raw edge.
Step 6: Fold backing along line
Step 7: Fold the backing in half again (I drew a line in the first photo with marker so you can see where) to line up raw edge with edge of quilt top.
Step 8: Fold backing over again at the quilt top edge so that it again overlaps the quilt top by 1/2.” Repeat this method all the way around the quilt until you have the entire quilt backing folded and pinned.
Step 9: Stitch close to edge of backing around entire quilt to finish.
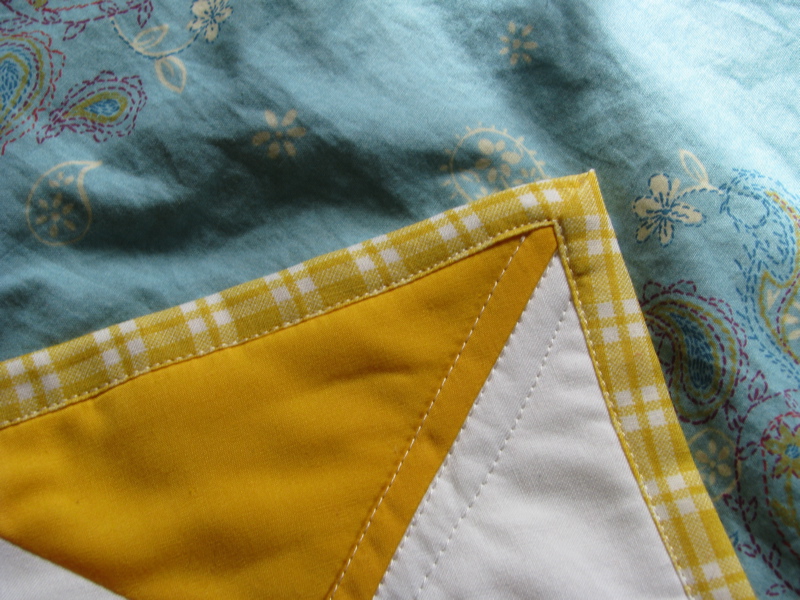
In the photo above, you can see that your quilting lines will be visible past the stitching for the binding since they go all the way to the edge of the quilt top. As long as my stitching blends in with the quilt backing, I don’t sweat this too much, but if you don’t like how this looks you can pull out those threads and knot them where you want them to end using a needle.
Ta-daaaah! Finished quilt!
55 Responses to Rae pretends she can quilt (and shares a quick quilting tutorial)
Leave a Reply Cancel reply
about Rae
Hi! I'm Rae, Head Boss Lady of Made By Rae Enterprises. I love to sew. This blog is a showcase for my crafty stuff.
More about me...
Email me!Sign up for my newsletter!
blog archive
spring tops!
add your photos to our Spring Top Sewalong Flickr group!
more info here
all MBR photo pools


I offer licenses for handmade sellers who would like to sell items made with my patterns on a small scale. To see all of the available licenses, visit the 


Thanks, Rae!
Also, Jennifer over at CraftSanity shared another quick quilting tip.
I think she said she lays the batting down, then the top quilt and then the backing (face down). After sewing around the edges, leaving several inches unsewn, she flips it inside out so the backing and raw edges are on the inside. After sewing the opening closed, you're done!
I love it! I am also not a quilter, but love simple quilts like this one.
thanks!
Awesome Rae! I'm not a quilter either…..I've only done one (which I am quite proud of), but because it took me FOREVER to piece together I sent it out to be machine quilted…..I probably would have messed it up otherwise. I'm dying to get more into quilting…..just have to find the time (and patience).
I don't think there is anything better feeling than a good quilt.
Great job – love the solid colors with the white. Go girl!!
Lindsay
i love the very simple pattern you chose to organize white and coloured fabrics, i think i will use it for a quilt i want to do.
Rae, it's great. I love those colours, it looks so bright and fun!
This is BRILLIANT!! I cannot thank you enough for posting this! I too, and NOT a quilter, but, I've decided to try, I have the quilt front mostly done – just a couple more seams to sew, but I've put off finishing it b/c I don't know how to do the binding edge. I am so inspired to finish that dang quilt now!!
THANK YOU!!
I'm not a quilter either, but have a quilt top all finished and ready to go, but have been fearing binding. I'm going to give this a shot! Thanks!
Thanks for the binding tutorial. I had noticed that my great aunt (a very prolific quilter) bound her quilts this way and since she is no longer here to ask, I was trying to figure out how she did it! And you did it for me, so thanks!
That's not cheating!! That's almost exactly how "real" quilters do it too! =)
Rae thank you so much. Especially for how to do the corners. I am getting ready to quilt a baby quilt this morning my first and had decided to use the backing for the binding but hadn't figured out how to do the corners, yet.
Coming from the SMS blog to say thanks for the tutorial over there & this one here. Your methods make the process so much appealing for me & there's actually a chance that I might now start & finish a quilting project!
Fabulous! I am in the process of creating (um, in my mind for the time being) a quilt for my son. Never having done this before, I'm completely intimidated. I'm excited to try this binding trick and read the Sew Mama Sew! article as well.
I guess I'm a cheater 'cause that's he wtay I bind my quilts
Don't call yourself a quilting impostor! I think many of us have never taken a quilting/sewing class and have just learned by the fly (definitely my method). Just think of yourself as one of those talented, self-taught geniuses!
What a great "cheat" for binding…will have to remember that for later!
Looks awesome Rae! Once you start making quilts, you'll never want to stop. Consider yourself officially addicted. Welcome to the club!
http://downtosew.blogspot.com/
I really think we could be bff in real life. Sigh.
The colours in your quilt match your Made By Rae blog header!
Great quilt – such cheerful colours! I might have a go myself! (Never quilted in my life!)
Love your blog
Turned out fabulous, I love the colors, they match your blog header! So cheerful and inspiring. I've only done one quilt so far but am addicted now. That binding trick is awesome!
Can I share my patchwork Buttercup Bag with you? Yeah…I am definitely NOT even a patchwork person!
http://livelearnlove226.blogspot.com/2010/10/patchwork-purse.html
This looks rather similar to your banner… NICE
i love this method of binding. some don't, but i find it fast and finished easily– instead of waiting for me to do it by hand.
Rock it girly.
My first quilt was when I was 16, and my mom bound it for me. She's not a quilter, and this is how she did it. I think I may have to try it!
I love you for that binding tutorial! I frequently use the backing for the binding, but I've never found a good technique for mitering the corners. This problem has been known to bring my projects to a screeching halt for months at a time until I'm willing to tackle the problem (usually with very little grace). Hopefully this new technique will get me going again!
thank you so much for sharing this "cheating" method. i have plans to make my first quilt and i think this "cheater" binding method is awesome and makes so much sense! it will be much easier to give this a go rather than the traditional way.
thanks for everything you share!
Totally used this today when I sewed up 6 Christmas Tree "Wall Hanging" Blocks (UGH!!) … it worked very slick. And I noticed if I didn't quilt right up to the edge (I was doing free motion) I could pull back the backing and trim the batting using my rotary cutter.
Thanks for the new trick
.
Hi Rae,
Just a couple of hints to help you with your quilting. I loved the simplicity of your tutoral. A hugh difference between sew and quilting is the seam allowance. To sew we do 5/8th of a inch and with quilting its 1/4 of a inch. quilt is more exacting and its like putting a puzzle together. It is so important to square up all the blocks to be exactly the same size. They go together easier and lay better. You also need to stitch it together after you turn it so it don't move all over. Start in the middle and work out with a stitch in your seams better known as stitch in the ditch. When you make your sandwich tape the backing face down in place on a table or whatever. Then cut the batting a little smaller and then put your top down face up; Or you can do the envelope thing you did. You no doubt could become a good quilter and it also helps you with making even better garments etc. Keep trying or take a few lessons. It is so much fun when you can do both and now I am doing both for great grand babies. VB
Rae – thank you! This is a brilliant binding method…I've always been frustrated by binding quilts (well, the 1 I've made previously) and this made my quilt binding so much easier!
thanks again! i left a comment a few weeks ago, and am now back to say that i tried it and it works great! thank you!!!
Hey, this is a fabulous tutorial! We think this project is great, and we want to share it with other sewers and quilters by featuring a link on http://www.WeAllSew.com! We’ll be featuring a link to your project right here at your blog at the "Free Stuff" page of http://www.WeAllSew.com all next week. Please let me know if you have any questions about being featured at WeAllSew.com. Thanks so much-Erika
What a fresh-looking quilt, and a nice binding method! I am also not a trained quilter and love learning things that make the process less intimidating.
I'm not a quilter, although I could probably manage something like this as this was, hands-down the BEST quilting/binding advice EVER! I struggle with binding and this should take away some of that anxiety. And, some of us just like to craft and sew and don't want all the calculations and precision work of traditional quilting. This is somewhere in between but still allows us to create something we love. Thanks, thanks!
I am not a someone who has ever quilted, nor thought I would. 'My mum does that', but slowly I feel a draw towards it, hmmm. Maybe this tutorial will help me get off the ground.
PS. Your blog is inspirational. Thank you.
Tah Dah…Just used your tip for binding in the corners…You Rock! It Worked! Thanks so Much…I will try to post a picture after I gift the quilt!
Love it! I am a pretend quilter too, and this will help me out!
This little tip is so clever – I follow your blog, but I must have missed this insightful post, because I found my way back via http://knittybitties.blogspot.com/2011/03/spring-mug-rug-tutorial.html
[...] I like sewing bindings by hand, but since there are eight of these, I tried Made by Rae’s cheater binding method. I like how it looks, at least from the front. I’m not really crazy about how it looks on the [...]
[...] sew-along placemats, I was excited for a quick finish because I was going to use the awesome cheater binding method that I used for my last set of placemats. I hadn’t cut out the backing fabric in the first [...]
[...] – great tutorial on how to use your quilt top as binding from made by rae [...]
I am smiling as I read today’s blog and the comments. You don’t need to have had lessons to claim to be a quilter. You don’t need to have followed any rules. A quilter is someone who quilts and so many of you who responded have quilted. So, may I say, and emphasize, that every one of you who has made a quilt is most definitely a quilter! Pat yourselves on the back, and proudly proclaim to be quilters! You deserve it! – And in case you wonder why I am claiming the privilege of making such a pronouncement, I am a quilt designer and editor of The Quilt Pattern Magazine as well as owner of Quilts for Sale.ca. I feel qualified.
[...] turns out, my thanks to Made by Rae, that you don’t actually have to attach binding–you can use the backing itself, which I [...]
Thank you for the tutorial on how this is done.
Thank you for sharing this! I love the way this binding works…so fast and fun. I made a couple of mug rugs using your cheater binding and I’m hooked! Thanks again!
Oh Wow!!! Thank you, thank you, thank you. I have two chenille quilt tops in my cupboard hiding them away as they make me anxious every time I see them. You see I made them 3 years ago for my two daughters and after binding just one cot quilt I couldn’t bring myself to binding these larger bed quilts.It was just so dreadfullly difficult for me to do the binding on the cot quilt. I am now going to the two quilts out of the cupboard and get them done using your technique.
[...] fabric to make my own. Just before I used the not-quite-matched bias tape I bought, I remembered Rae’s cheater binding method. The day was saved! I just used the backing fabric, folded over, to bind off the [...]
I do this too! So simple and, basically, I am horrible at binding.
[...] is not a perfect quilt. I didn’t hand stitch anything except the owl’s eyes. I used the backing of the quilt for the binding and the lines are super messy. I didn’t fold under the appliques and decided to pretend that [...]
I wanted to say ty so much for this tutorial. It has really made binding much more possible for me! I wanted to let you know that I shared a link to your tutorial on my blog today and blogged about my love for it, with my first successfully bound project using it! Ty again so much! http://domesticdeficitdisorder.blogspot.com/2012/08/a-quilting-not-so-secret-secret.html
[...] dark! I totally used Rae’s Storytime Squares quilt pattern, complete with fabric adhesive and cheater’s bind-off method. Rae’s instructions were great and easy to understand. Not bad for my first real quilt. Back [...]
i struggle with binding, this looks like my new method, no one will know.
[...] enough interest I could probably post some instructions for this version as well. I used my “cheater bindof method” for this quilt, super easy and — extra added bonus! — because I quilted all the [...]
want to know a secret? That’s how my grandmother, who was a “real” quilter finished *all* her quilts!
The one drawback of this technique is that the binding stands a better chance of wearing thin after repeated washings. Traditional bindings use fabric that’s been cut on the bias, and somehow that makes the binding less prone to wear thin. Or at least that’s what I read somewhere. That being said, most of my quilts have been bound using the “cheater” method. What can I say? It’s definitely easier!
[...] of the tricks I’ve picked up is a cheater binding method. I use this tutorial from Made by Rae and it has revolutionalized quilting for me. Typically, the part of quilting I [...]