
Tutorial by Rae: Dragon Slippers
I thought I'd kick off our month of boy with a tutorial for these extracute dragon slippers. Elliot is really into monsters and dragons lately. When he asks me to tell him a story at night, the usual request is for the kind I make up about "Prince Elliot and his friend Drew the Dragon." Nothing special, just a boy and a dragon and their silly adventures, but he loves it. For a while, I'd even catch him occasionally talking to an imaginary Drew. *cute*
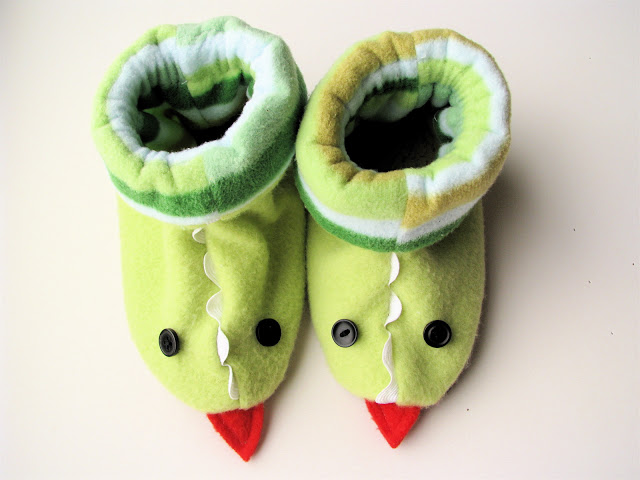
I thought these little dragon (monster? lizard? dinosaur?) slippers would be perfect to keep those little toes warm on our hardwood floors.
The little black button eyes are key to making them look like creatures:

and the little tongues are pretty hilarious.

Elliot got really excited about the first green pair I made him and wore them all over the house right away. They were a little snug so I made the blue pair a little bigger, and now Clementine has started wearing the first pair. Even though they're way too big for her, they stay on pretty well with the elastic around the ankle. So now I've got two kids walking around in these!

Although I designed this slipper especially for Celebrate the Boy Month, I think you'll find that other members of your family might want a pair as well. The good news is that the pattern for these slippers is made by tracing the wearer's foot, so this might actually work for any size boy (or girl!)

This tutorial is the intellectual property of Rae Hoekstra. You are more than welcome to use the images above (giving clear and proper photo credit of course), but please do not copy images or text from the tutorial below. Thanks!
Part 1: Make your pattern pieces

Step 1 (left): Trace both feet of the wearer carefully. If you have to let the wearer play Mario Kart or Angry Birds to make this happen, no one here is going to hold that against you.
Step 2 (right): Using a piece of tracing paper or a dryer sheet, superimpose both foot outlines with the heels overlapping. Smooth out any bumps as you trace.

Step 3 (left): Trace an extra 3/8" to 1/2" around the entire pair of outlines (shown in red marker), clearing both toes and adding a little length in the front if you want some room to grow. You can see where I did this at the top of the toes. Note: adding 3/8" will produce an exact-fitting slipper, so I recommend adding some extra for growing children.
Step 4 (right): Now cut this shape out of paper (this will be your final pattern piece for the sole; we don't want all those lines on the final pattern) and trace a line 1/4" from the outside edge to mark your seam line.

Step 5 (left): Measure around your seam line carefully with a measuring tape or string. Elliot's slipper seam line measured 44 cm.
Step 6 (right): Now take half of the seam measurement and write that number down. We will call this number "X" and we need it to make the upper pattern piece for the slipper (see next step). So for Elliot, X=22 cm

Step 7 (above): Draw your pattern piece for the upper part of the slipper upper using the template provided below. The pattern piece will consist of a line across the bottom that is X long, a vertical line on the right side that is 0.75X, a line across the top that is 0.7X, and a line down the center that is 0.35X. Then draw a small line up from the bottom left that is 3/8" or 1 cm tall, and connect it to the center line with a diagonal line. Remember that those little boxes in the corners indicate right angles. [Little math reminder: To get "0.75X" you'll have to take X and multiply it by 0.75 to get the number you need]Note: You can also go ahead and round the corners adjacent to the diagonal line a little if you like.

[click to enlarge image]
A SEAM ALLOWANCE OF 1/4" IS INCLUDED IN THIS PATTERN. Although you will lose a little bit of fabric on the upper slipper seams, fleece stretches easily and I think you'll find that the difference doesn't really matter unless you are making a very small slipper, for a baby for example. In this case, you may want to add 1/4" around the slipper.
Step 8:
Make a pattern piece for the tongue by drawing a shape like the one in the template provided. I find it easiest to make a 1.25" by 1.5" inch rectangle and then trim two of the corners off with curved edges towards the center.
Part 2: Assembling the Slippers
You'll need the following materials for your slippers:

stretchy fleece for the slipper upper
(shown at top, in one or two colors, depending on whether you want a contrasting inside or not)
sherpa-lined fleece for the sole
(shown at right, available in the home dec section at most craft sewing superstores. Decent alternatives might include: a felted sweater, a piece of thick fleece, or even two layers of fleece basted together)
scraps of red fleece or felt for tongue
jumbo ric-rac
1/2" wide elastic
safety pin
4 small black buttons
needle and thread
Also recommended: a stretch needle for your sewing machine

Step 1 (left): For each slipper, you'll need to cut out four upper pieces, two tongue pieces and one sole. So for each pair of slippers, cut 8 upper pieces, four tongue pieces, and two soles. The instructions here will be for ONE slipper, so you'll have to repeat each step to get a pair.Hint: Cut the fleece for the upper parts of the slippers with the stretchiest direction of the fleece running parallel to the bottom of the foot. If you look carefully at the diagram above, you'll also see that I curved the front edge of the slipper when I cut the pieces out.
Step 2 (right): Sew ric-rac along the front edge of a slipper upper piece, with the edge of the ric-rac lined up with the front edge of the fleece. Try to stitch along the middle of the ric-rac as close to the front edge of the ric-rac as possible without going off the ricrac at all, if that makes sense. If that doesn't make sense to you, just stitch down the center of the ric-rac.

Step 3 (left): Pin another slipper upper to the one you just stitched the ric-rac to, and stitch along your ric rac stitch line to sew together with a 1/4" seam.
Step 4 (right): Sew the back side of the slipper; repeat steps 3 and 4 for the lining of the slipper.

Step 5 (left): Turn lining inside out and place outside of slipper over it (so their right sides are facing). Sew together around the top edge with a 1/4" seam.
Step 6 (right): Turn both right side out. Now push the lining back inside slipper (not shown)
Steps 7-9 are optional but HIGHLY recommended for babies/toddlers. Also note: I did sew the tongue to the top part of the slipper at this point when I made the green slippers, but I'd recommend waiting until Step 11 instead.

Step 7 (left): Sew two lines around the outside of the slipper for the elastic casing, one roughly halfway up the slipper, and the next about 3/4" above that. I usually try to line up the stitching with valleys in the ric rac, and I backstitch before and after the ric rac instead of sewing over it, which can flatten it.(right) Remember to leave a hole in the lower line of stitching to allow for the elastic to go in.

Step 8 (left): Cut elastic roughly the length of the slipper and put a safety pin at the end. I find I actually need about an inch less than this, but it's always good to have a little extra.
Step 9 (right): Thread elastic through casing. Pin ends and try on your child if possible, adjust elastic length if necessary, then zigzag stitch back and forth through both layers of elastic to secure.

Step 10 (left): Sew two of the tongue pieces together with a 1/4" seam along the curved edges.
Step 11 (right): Attach tongue to the center front of the outside of the sole by sewing across the short side of the tongue.

(left) The upper part of your slipper should now look something like this photo, minus the tongue. Now turn it inside out (not shown).
Step 11 (right): Take a look at the front center seam of your slipper. If it's a little bit pointy, trim it slightly at the center seam so that it's a more curved. This step is optional but I find it makes it easier to sew the upper part of the slipper to the sole. I did this with the blue slippers (but not the green ones because I had curved their pieces a little more when I cut them out) and found it helps make a nicer looking slipper.
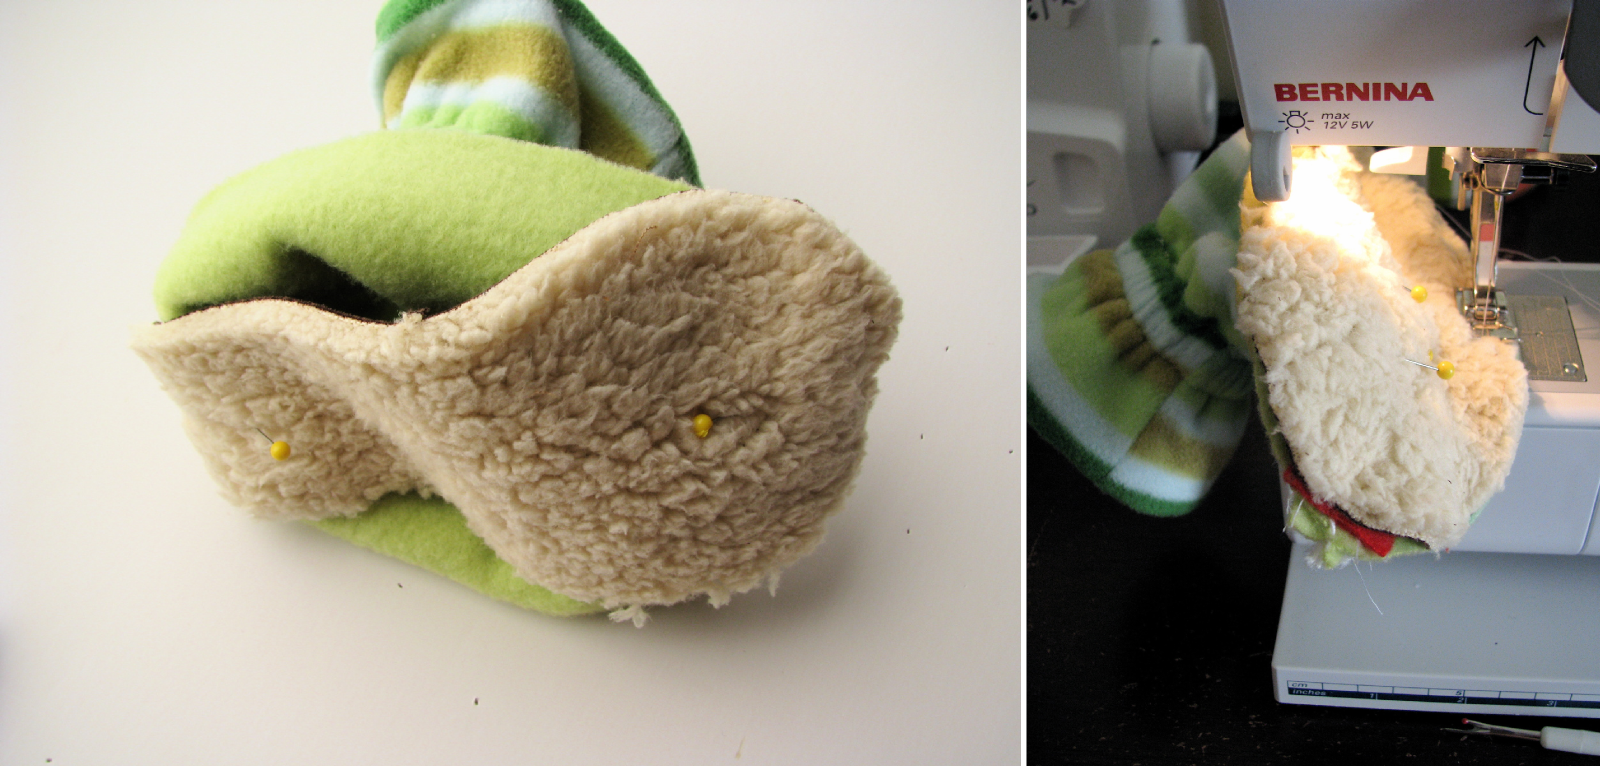
Step 12 (left): Pin center front and center back of slipper to sole with outsides facing (the inside of the sole and the inside of the upper part of the slipper should be facing out). Pin around entire slipper, carefully lining up all three edges as you pin. You may need to stretch the fleece a little to fit around the sole, that's just fine.
Step 13 (right above and left below): Sew together using a stretch needle and a 1/4" seam allowance.

Step 14 (right): Zigzag stitch along seam allowance to finish inner edge.

Step 15 (above): Turn slipper right-side out. You can see that the blue slippers don't have the elastic; but they get tighter at the ankle when folded over though. Full disclosure: they don't stay on as well as the green ones!

Step 16: Sew buttons on either side of ric rac to resemble eyes. Safety reminder: please embroider the eyes using just thread or use safety eyes rather than using buttons for very young children or babies!
Try slippers on toddler and watch as excitement unfolds!
Find more great tutorials on my Tutorials page, and see all of the BOY posts right HERE.
If you liked this post, please consider supporting my shop by buying one of my sewing patterns, or becoming a paid subscriber on my Substack. I design patterns for kids and grownups!