Tutorial by Rae: Magnetic Snap
It always surprises me how many people have never used a magnetic snap. Both my Buttercup Bag and Bonsai Bag sewing patterns call for a magnetic snap, and they're a snap (sorry!) to put in. Seriously, SO easy, and they look so snappy (sorry!! hee) that I figured it was time to make sure that everyone knows how.
Step 1: Reinforce your lining
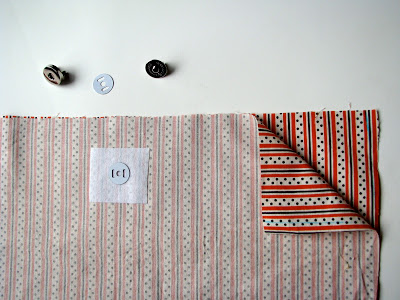
A magnetic snap attaches to the lining of a bag or purse, which is almost nearly always made of two identical pieces of fabric (front and back). You don't want it to tear through the lining fabric with wear, so before you put in the snap you'll need to iron a little square of fusible interfacing to the WRONG SIDE of the lining with its center where you want your snap to go. I usually cut my interfacing square 1.5"-2" across. Find the center of the lining, and then place the square well below the seam allowance on the top edge of the lining's WRONG SIDE:
The picture above is of the Bonsai Bag lining; that pattern has a 1/2" seam allowance, so in that pattern you place the 2" square one inch below the top edge.
For the Buttercup Bag (a smaller bag with a 1/4" seam allowance) the pattern calls for a 1.5" square of interfacing to be ironed 1/2" below the center top.
Step 2: Overlap lining pieces and take your snap out of the package
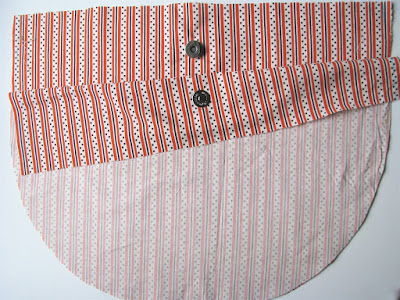
Place your lining pieces right sides together so that all the edges are lined up.
Take your snap out of the package. Each complete snap has two sides, and each side of the snap has two parts, a front and a back, so you'll need four pieces for your purse.
Step 3: Mark where the snap will go
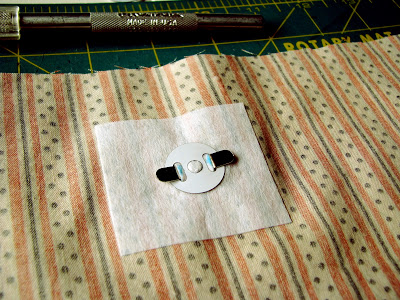
Take one of the circular snap backs and center it over the square. Two of the holes look like vertical slits. Make sure those are perpendicular to the top of the purse as shown, then mark their location on the interfacing.
Step 4: Cut holes through both linings at the same time
Using a sharp blade* and keeping both linings together and lined up, cut through both linings at the same time. This will insure that both sides of your snap will be lined up perfectly.
*But Rae, what if I don't have a sharp blade? (UPDATED: thanks to a clever commenter who reminded me that a sharp seam ripper also works great for this!) You can also fold the interfacing in half horizontally and snip those lines carefully with a sharp scissors. Just make sure you hold both lining pieces together carefully and don't let them slide!
Step 5: Push snap through holes
Separate the linings and push the snap tabs of one of the snap halves through the holes of one lining piece. Remember that the tabs should go to the wrong side of the lining.
Step 6: Place back on snap and push tabs apart
Now place the circular snap back over the tabs, and press those tabs outward. Repeat for the other lining piece/other half of the snap:
Finito! Doesn't that snap look sharp? Here's what it looks like on the Buttercup Bag (after a pocket was added):
Now you can finish up the rest of that purse! (Rather wonky inside-of-purse shot shown below)
A little tech-talk: You'll notice that because my interfacing square was 2" and I placed the square 1" below the top edge and lost a 1/2" due to seam allowance, that the snap is now centered 1.5" below the top edge of the finished purse. If your interfacing square is 1.5,"your seam allowance is 1/4," and your square is placed 1/2" below the top (as in the case of the Buttercup Bag shown below), the snap will be centered 1" below the top finished edge.


