
Adding Trim to the Geranium Dress

I've made quite a few versions of the Geranium Dress for Clementine that feature trim along the armholes and bottom of the bodice, and I wanted to show you how! It's super easy and it really looks great. My favorite trims for necklines are ric-rac and pompons, and lace or piping would be really sweet as well.

trimduo
Note: This tutorial assumes you already have the Geranium Dress pattern, which you can buy here (or download the free Little Geranium pattern if you want to try it out in the 0-3 month size)!
Step 1: Baste trim to armholes
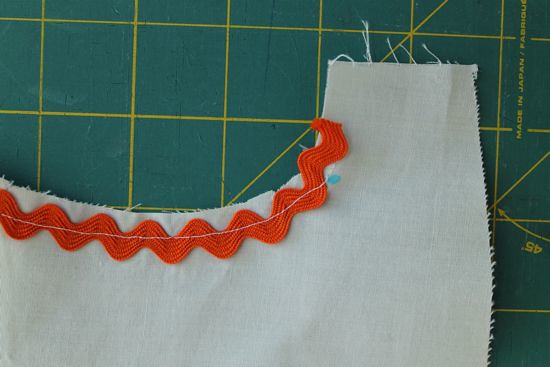
After sewing the bodice shoulder seams together as instructed in the pattern, machine-baste a piece of trim along the armhole between the dots you marked from the pattern, with the part of the trim you want to show on the left side of the needle. In other words, on the opposite side of the stitching as the armhole. At each dot, leave a short "tail" on each end of the trim (you'll see why in a minute).If you are using Little Geranium, which does not have the sleeve dots marked, just eyeball it; you want the trim to end roughly at the curviest part of each armhole.
Array

Array
Make sure you line the trim up so that your basting stitches land 3/8" from the edge of the armhole. Why 3/8?" Because that's the seam allowance for this pattern. The exact position of the trim will of course depend on how wide your trim is and how much you want to show on the outside of the dress. In the case of the white pompon trim, I had to place it about 1/4" away from the edge so that the stitches would be in the right place.

Array
When sewing ricrac, it can be a bit tricky keeping the ricrac lined up properly. I find it's easiest to use medium-sized ricrac because then you can line up the edges of the "bumps" on the ricrac with the armhole edge.

Array
Now repeat for the other armhole.

Array
Step 2: Sew bodice and lining together, sew side seams
Now sew the lining to the main bodice as instructed (HINT: You can use the stitching lines from attaching the trim to sew the armholes, just sew directly over them!)

Array
Make sure that the ends of the trim get pulled towards the seam allowance when you do this. This will prevent the ends from showing on the outside of the dress.

Array
Step 3: Baste trim to bottom edge of bodice
Once the side seams are sewn, you can baste the trim to the bottom of the bodice. Pin the lining out of the way to make sure you don't accidentally attach the trim through both layers, just the outer bodice. This time, you'll attach the trim so that the stitches are 1/2" away from the bottom of the bodice (the seam allowance for attaching the skirt is 1/2"). When you get to the back, stop about 1/4" short of the edge and leave a short tail on your trim in the same way you did at the armholes.

Array

Array
Step 4: Attach skirt and so on...
Once you've done that, you can attach the skirt to the bodice (use the trim stitching lines again as a guide) and finish up your dress as instructed in the pattern. It might also be fun to add trim to the hem, don't you think?

Array
I just love how smart this looks. Trim definitely takes it to the next level!