
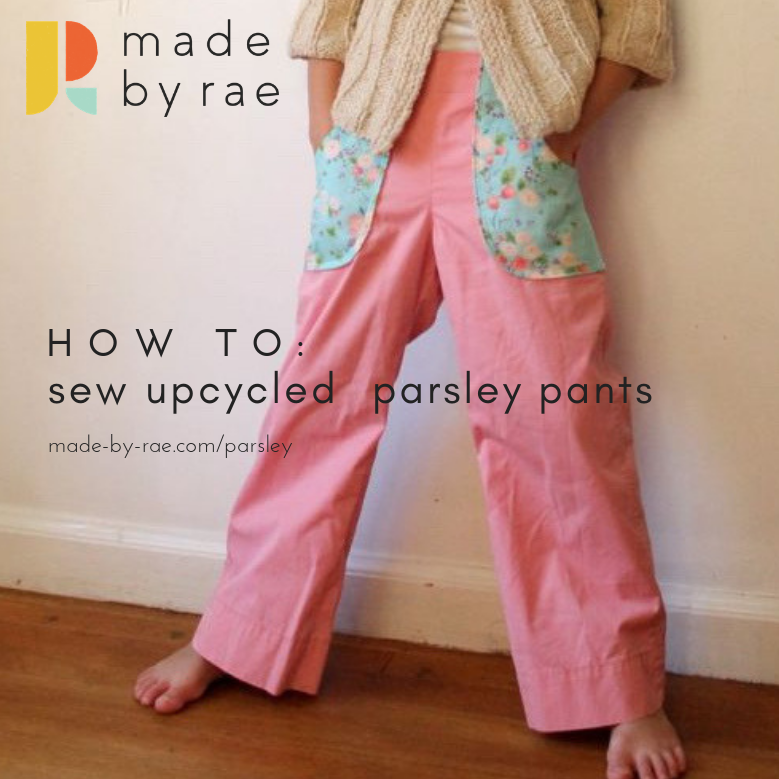
Upcycled Parsley Pants
One of the reasons I designed the Parsley Pants the way I did (as a 2-pc pant) was so that I could whip out pairs for my kids in no time flat. Seems the other patterns I had for pants often involved zip flies, recessed pockets, multi-pieced waistbands, or some sort of extra finishing at the cuffs or hems, and while I love those pant patterns too, they just aren't FAST. You know? I wanted something like the Flashback Tee (another new striped Flashback for Clementine is shown below) something that could come together in an hour without too much hassle. And thus the Parsley Pant pattern was born.

Array

Array
But...there's something that makes them even faster: upcycling old adult pants for the fabric. Because then...NO HEMMING!!! So last week I cut apart two pairs of JCrew chinos in pastel colors that I used to wear back in the 00's and turned them into pants for Clementine. The addition of the pouch pockets was the only thing that kept these from being a half hour project, seriously. And they are not only adorable, but she wears them. DOUBLE YAY!

Array

Array

Array

Array

Array
Here are a few tips for upcycling old pairs of pants into Parsleys:
use old pants that aren't too worn out; the fabric needs to be in good shape. You can cut around (or cover up) stains, but make sure the fabric isn't threadbare at the knees or anything. You want these pants to stand up in their second life as kid's pants!
I usually only use old pants that still have their cuffs or hems in good shape, so that the old hems can become new hems.
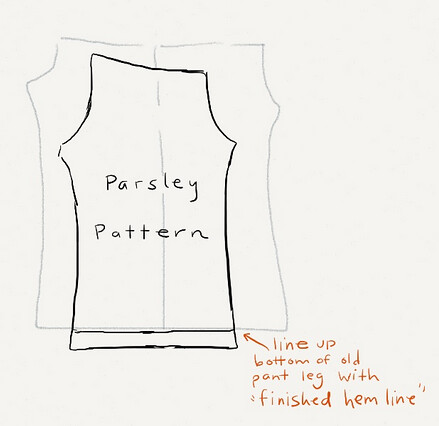
To harvest the old pant fabric, cut up the inner leg seams (inseams) with a scissors, then up the crotch seams in front and back, then across the sides of the pants below the waistband as shown in the diagram below. Usually there's not much salvageable fabric in the waistband, zipper area and pockets, so I just cut those away. DO NOT CUT THE SIDE SEAMS OPEN! LEAVE THE HEMS INTACT!

Array
Then lay your pant fabric flat (as flat as you can; some women's pants have shaping at the hip on the side seam) and place your Parsley pattern over top of the fabric with the original pant hems even with the line on the pattern that says "finished hem line," and the side seam of the original pant as close to the "tuxedo stripe line" as possible (see diagram below; the lower layer in the diagram is the old pant leg opened up and laid flat). Cut out two mirror image pant pieces, then assemble them according to the instructions.
Array
You can still add pockets, tuxedo stripes, pintucks, a flat front, or any of the other "extras" that come with the pattern. The main difference here is that you don't have to hem them, because your hems are already finished!
Additionally, the old side seam makes it look like you've put in extra work when you haven't. NICE.

Array
The big win here for me was the addition of two new quick and cheap pairs of pants to Clementine's wardrobe (and the tee was quick too!). Love it!