
Super seams!
Today I want to talk to you about something I think is pretty important when sewing for children: taking a little extra time whilst sewing to make sure your seams are nice and strong. Let me show you what I'm talking about. Take, for instance, these cute little shorts I made for Clementine last week from my Parsley Pants pattern (shortened into shorts; see the how-to post here):

Array
They look pretty innocent and adorable, right? What you don't see, though, is that on the inside they have...

Array
SUPER SEAMS!! That's right. Don't be fooled by the cuteness, people. These shorts are made to last.

Array
When I began making clothing for my children six years ago (for BABY Elliot!), I used a pinking shears to trim the seams, figuring that would help keep them from fraying. The trouble is that kids are pretty rough on their clothes. All that crawling and rolling and running around? After washing the clothes multiple times I started to notice fraying seams, which led to holes. It felt like a waste of time to spend precious nap hours making a pair of pants for Elliot, only to go back and fix them later. It was always worst with the pants and shorts.
Now when I make my kids shorts or pants, I have three ways I like to "finish" my seams. But first, if you need a quick review of the basic steps to sew a pair of shorts or pants, check out this handy-dandy post first:

how to sew shorts
(by the way, these steps are outlined in MUCH greater detail, along with hints, in both my Parsley Pants Pattern and in my Newborn Pant tutorial, which also includes a free template)
OK, so now that you have the basics, let's take a look at three ways to finish a seam to make it a SUPER SEAM!
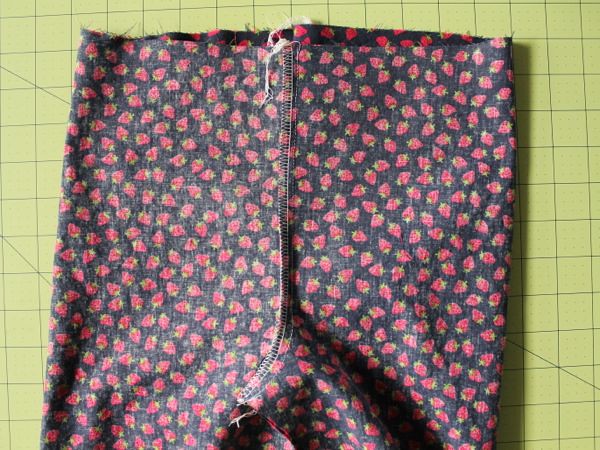
SUPER SEAM #1: Fold and stitch down
I use this seam finish most often when sewing the center seams (step 1 in the basic steps above). First, to make the seam itself stronger, I use a "5 stitches forward, 2 stitches back" approach, meaning I stitch forward a spell, then back a couple stitches, forward a bunch, back a couple, and so on. This insures that the stitches themselves won't pull out with wear.

Array
Then to prevent the seam allowance from fraying, fold each side under on either side of the seam, and stitch the folded edges down.

Array

Array

Array
A quick easy seam finish that takes almost NO extra time! Here's what it looks like from the outside:

Array
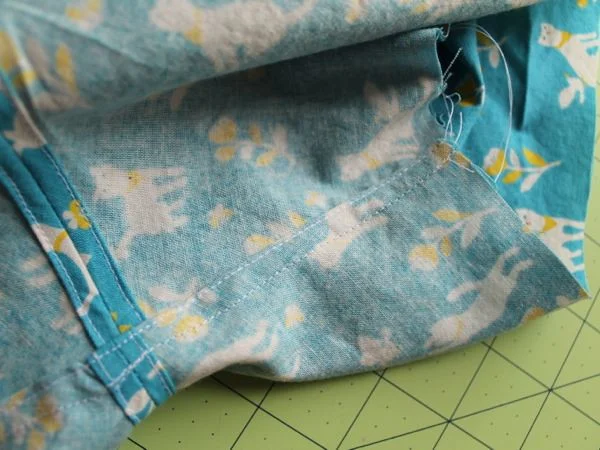
SUPER SEAM #2: Flat fell
I use this seam finish most often on inseams (step 2 in the basic steps above). After sewing the seam, trim one side of the seam allowance to half the width of the other:

Array
Then fold the bigger side around the trimmed side (to enclose it, if you will):

Array

Array
Finally, press it flat and stitch it down. Takes a little extra time but has the added advantage of being super strong AND looking awesome.
Array
SUPER SEAM #3: Serge and stitch down
If you have a serger, you can finish seams quickly just by running them through the serger after you've sewn them. Once you've serged them, press them to one side and stitch them down. Main disadvantage: You need to own a serger. But for speed reasons, this is definitely my preferred method.

Array
Array

Array

Array
UPDATE: If you don't own a serger, you can use a zig zag stitch over the edges for the same effect -- works just as well, just doesn't look quite the same.Note: I don't usually use the serger to sew the seam itself, because if I make a mistake or need to adjust something once I've tried it on a kid, a serged seam is a heckuva lot harder to un-sew.
Here's what this finish looks like from the outside:

Array
So that's it! I often use a combination of two or more of these finishes on one garment. I think you'll find that using these three seam finishes, you'll be able to make clothing for your kids that will last without much extra time invested. Put them on your kids and watch them go!

Array
sotl post 2013 640px
You can see a few more pictures of the blue shorts in action on Clementine over on this post.
If you need a bit more detail or want to read about even more great seam finishes, I highly recommend these other top-notch resources:
Sew Mama Sew's Seam Finishes Simplified
Seam Finish Tutorial Roundup from the Coletterie
This post was originally posted in 2013 as part of a fun online event called "Shorts on the Line!" It's a summer sewalong all about... shorts! It's hosted by imagine gnats and small + friendly. Fabulous guest bloggers are posting their shorts inspiration, tutorials, and pattern reviews. Check out the other posts in that series for more shorts inspiration!