
Knit Necklines, Part III: Invisible Bias

Array
Today’s Knit Necklines tutorial (see Part I and Part II for standard neckband and bias-bound neckline finishes) will show you how to finish a knit neckline with a strip of knit fabric, but this time it gets flipped to the inside of the tee so it’s invisible…well, sort of. Technically, a line of stitches will still be visible, but the strip of knit you use to finish the neck won’t be. I love this finish for Clementine’s tees (this one and this one, for example), and it works especially well on boatneck tees. On top of that, it’s super profesh looking. And one other thing: if you loath hemming knits, this is also a great alternative for cuffs and hems!
One caveat: this neckline finish, unlike the previous two, makes the entire neck hole 1/2″ wider because the seam allowance flips to the inside. You can always go ahead and add additional 1/4″ to the entire neck edge of the tee before you start if you think you might end up with a neck hole that is too large.

knits
First, let’s make sure you’re ready to sew:
put a ballpoint or stretch needle in your machine
stitch length is set to a slightly longer straight stitch
I HIGHLY recommend stretch thread (be sure to read my post on stretch thead if you haven’t already!). If you can’t rustle up some stretch thread, set your machine to a long-ish narrow zig-zag stitch (so: stitch length somewhere between default and basting, stitch width close to 0) and use a standard polyester thread in your machine. In this tutorial I used stretch thread for all of the stitching shown (except for serging the tee together before I began), so if you use regular thread you’ll need to use the zig-zag stitch instead.
Start by sewing the tee together at the shoulder seams (I also went ahead and sewed the sleeves and side seams too, but you really only need to do the shoulders before you finish the neckline).
Step 1: Measure neckline and cut out the knit strip

Array
As in the previous two tutorials, take a flexible tape measure and measure around the neckhole. Cut the strip as long as your neck hole and 1″ wide. You won’t need the whole length but it’s easiest just to start with this much. Remember to cut the strip out along the direction of stretch, as shown above!
(see yesterday’s tutorial, step 1, for more on the direction of stretch and fabric recommendations! I also discuss why this strip is not really a “bias strip” in that post)
Step 2: Attach the knit strip to the outside (RIGHT side) of the neck hole with a 1/4″ seam
Array
Beginning at a shoulder seam and folding over the end by about 1/4,” sew the strip to the neck hole with a 1/4″ seam. The RIGHT side of the knit strip should be facing the RIGHT side of the neck hole. As you go, gently stretch out the strip of knit out a bit (but not too much!). When you get back to where you started, overlap the ends by 1/4″-1/2″ and trim the rest of the strip away.
Hint: If you’re using this finish for a boatneck tee, stretch the strip more at the shoulder seams (where the neckline is most curvy) and a bit less at the center front and back of the neckline (where it’s less curvy)
(again, please see yesterday’s tutorial for more photos and commentary on this technique; steps 2 and 3)
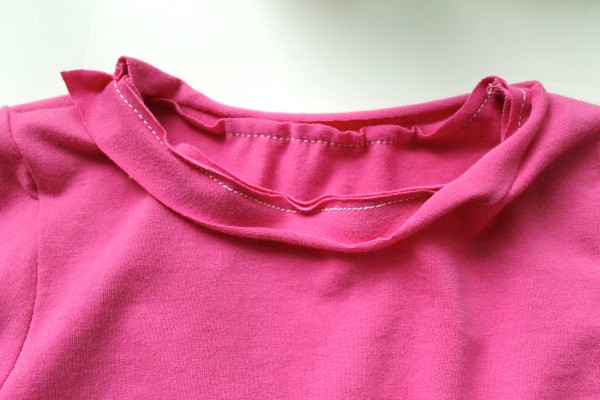
Step 3: Press it!

Array
Use an iron to press the entire knit strip away from the neck hole (above), then fold and press the top edge 1/4" under, towards the wrong side, around the entire strip (below).

Array
Step 4: Flip to the inside and stitch down
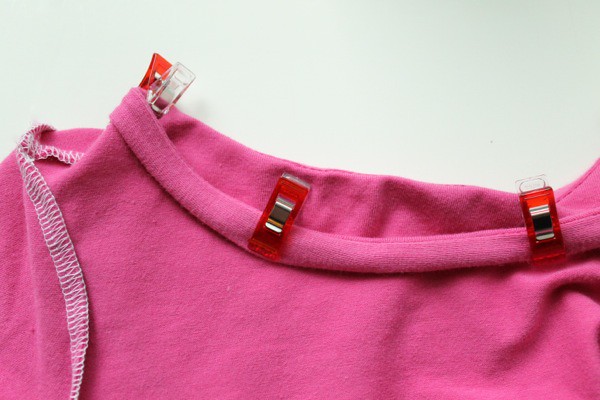
Array
Now flip the entire strip to the inside of the neckline so that it is no longer visible from the outside of the tee. Press it again, and pin (or clip) it in place.

Array
Sew along the folded edge (this is called “edgestitching”) to fasten the strip to the inside of the neckline. Again, you’ll notice I’m using a straight stitch here, but only because I’m using stretch thread. If you’re using regular thread, I highly recommend a narrow zig-zag stitch so that the neckline will be more flexible when pulled over the head!

Array
Voila!! Finished neckline!

Array
You can see more photos of this pink tee in action over at this post, and ALL of the posts in the KNITS: Stretch Yourself series over on my KNITS page.