
Luna Pantsalong Day 1: Measure, Print, Tape, and Trace
If you’re sewing along with my Luna Pantsalong, today is officially “Day 1!” Today I want to talk about choosing a size, prepping your fabric and pattern, and tracing your pattern pieces.

LUNA PANTSALONG: Day 1
Here are the previous Pantsalong posts just in case you need to go back:
Let’s have a Luna Pantsalong!
Luna Pantsalong: Inspiration
Luna Pantsalong: Planning
(you can find the Luna Pants sewing pattern here if you still need it)
By the way, don’t worry if you don’t have time right NOW to do these things, just bookmark this post and come back to it later when you’re ready. The purpose of the Pantsalong isn’t necessarily to challenge you to stick to a schedule — you can participate by sewing your own pair of Luna pants whenever you want — but to offer extra hints and support for sewing these pants online so they’re here when you need them!
The things we’re going to cover today should take just a couple of hours at the most (see my Planning post for the rough time estimates), so I’m putting them all together since you can easily tackle them in an afternoon or an evening. I also can’t stress enough how important it is NOT TO SKIP these steps. I’ll explain why when I get to each one.
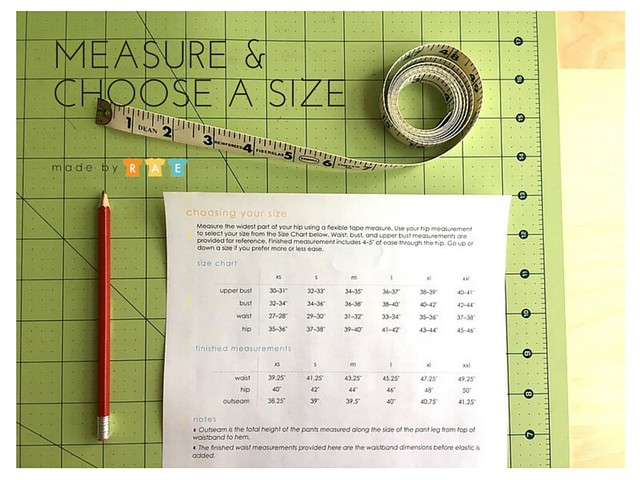
Measure and choose a size
Measure hip and choose size
If you want to sew a pair of pants that will fit, you are going to need to take your hip measurement. This is the key measurement you need to use to select a size whenever you sew pants, and the Luna Pants are no exception. Let me say it one more time:
YOU NEED TO KNOW YOUR HIP MEASUREMENT IF YOU WANT TO SEW PANTS.
Why is the hip so hard to measure?
I’ve discovered that the hip measurement is one of the most difficult body measurements to find/take, because the location of the hip on the body varies from person to person, making it hard to nail down an exact location for the hip measurement. The other thing that makes everything more confusing is that the hip measurement is usually NOT at your hip bones, which are (again, usually) much higher on the body, closer to your low waist, where you might find the waistband on a pair of low-rise jeans. Finally, the hip measurement is usually one of the largest body measurements, and it can be difficult to have to face that number, for the same reason it may be difficult to step on a scale.

Measure to Empower! Hips
Have someone help you if possible
Loop the tape measure around your body and hold the ends of the loop together, sliding the tape up and down a bit until you find the widest spot below the hip bones, usually around the biggest part of your booty or upper thighs. You want to try to keep the loop in a plane parallel to the floor if possible, which is why it really helps to have someone else hold it up in back (they don’t even need to see the number!). Once you are happy (OK, so maybe that’s not the right word, but let’s keep our eye on the prize here) that you’ve got the biggest spot, go ahead and get the number off of the tape. Once you have your hip measurement, find the Size Chart (found on page 2 of the pattern or on my Luna page, scroll down) and select your size.
Use low waist to check your size.
For Luna, it’s also a good idea to check your low waist measurement against the Finished Measurement Chart (also on page 2 or here). Again, your low waist is usually just above your hip bones, where the waistband of a pair of low-rise jeans would be (Luna pants will sit higher than this, however, when finished). If you’re “apple-shaped” and carry a fair amount of weight around your waist, this may actually be larger than your hip measurement. Ideally you want the finished waist of the pants to be at least 4″ (more is fine!) bigger than your low waist. If it’s not, you might need to add some width to your the pattern pieces at the very top to fit better at the waist, or go up a size and take them in at the hip and through the leg instead.
Wash and dry your fabric
Once you’ve chosen your size and decided on what fabric you want to use, you’ll be able to use the yardage chart to make sure you have the correct amount of yardage you need for your size and for the width of your fabric. Hint: it’s 3 yards for all sizes of 44″ width fabric and a little less than that for some of the sizes if you’re using 54″ wide fabric or wider, see the yardage chart (on the Luna page, scroll down). Go ahead and wash and dry your fabric (as long as it’s washable; please check the washing indications when purchasing your fabric!!) on the same washer/dryer settings you plan to use when you wash the pants once they’re finished. This is really important; you don’t want your pants to shrink once you wash them!

Print and check scale
Print your pattern and check scale
This step is OH SO CRITICAL. I can’t tell you how many people I know (pattern testers, workshop participants) who have printed the pattern out at the wrong scale and then proceeded to sew something that doesn’t fit. Every time it happens I want to cry. On the Luna pattern pages, there are marks along both sides of the page borders of the pattern piece pages so you can check the scale of each page. First, set your printer to print just the first page at 100% (or “No Scaling”) from an Adobe PDF reader or Preview on a Mac — not directly from the browser window, download and reopen the pattern in a PDF reader before printing — and then take out a ruler and check the marks on both sides to make sure they line up with the inch marks on your ruler. On the Luna pattern pages, there are marks along both sides of the page borders of the pattern piece pages so you can check the scale of each page, as shown here. Another option: trim the edges and use a cutting mat with inch marks to check scale. When you are absolutely sure they are right, choose the remaining pages, set the print dialog again to print at 100% (I always forget the second time!) and print the rest of the pattern pages.

Tape pattern together
Then you can trim the sides of the pages as shown above and tape the pieces together. I show how to do that in this post (from the Beatrixalong, scroll down to the second half of that post) if you want my tips on doing this quickly. Use the pattern layout diagram provided on page 6 to help you!

Trace your pattern pieces
Trace your pattern pieces
The last step for today is to trace your pattern pieces in the size that you will need. I’ve discussed how I like to trace my patterns in this post, again, you can check out that post if you want a few more details on how to trace a pattern with swedish tracing paper. You can also just cut your size straight out of your pattern pages, but personally I don’t like to do this until I am 100% certain I won’t need another size, ever. If you discover after making a muslin that you need to try another size, you’ll be really glad you didn’t cut into your pattern sheets! You can see how I store my PDF pattern printouts and tracings in this post, if you’re interested.
For the Luna Pants, you’ll want to trace the FRONT PANT, BACK PANT, FRONT WAISTBAND, BACK WAISTBAND, and POCKET piece. Do this carefully but efficiently, and don’t forget to add the notches and grainlines!! When you’re finished tracing, you can cut the tracings out with a paper scissors so they’re easier to manage. If you’re not ready to cut into anything right now, you can fold up these tracings very easily and store them for later.
OK, that’s all for today! Here are the two most critical things to remember: Don’t guess your size, MEASURE! and CHECK SCALE after you print! Hopefully I’ve provided you with some helpful information for getting started on your first pair of Luna Pants!!
***********
Want to participate in the Luna Pantsalong? Are you already working on your own pair of Lunas? Join us! Post a photo of your pants, either in progress or finished, to your blog or social media platform of your choice, and either link back to my blog or use the tag #lunapantsalong!