
Summer Tops, Week II, Day II
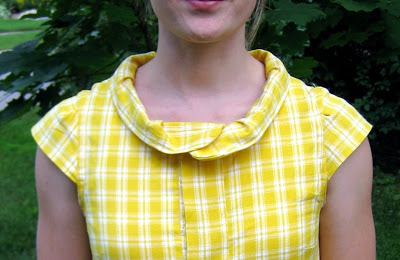
Thanks for all the Monday-top love! Yesterday's blouse was a practice run so I could use this (more expensive) yellow fabric. I'm not sure though; I actually think I might like the red one better. I will say though that the fit is really good on this shirt -- I'm not sure the pictures do it justice. Jury's still out.
I made this version a size smaller (small bust, medium hips on Kwik Sew 3222) than the last one, so it's more fitted and didn't require the empire waist modification. The Flour collar worked wonderfully again.

: : Collar Up : :

: : Collar Down : :

Fabric : : Purchased at Field's Fabric in Holland, MI. They were having a sale and had all kinds of this picnic-style plaid, in lots of colors. It has a linen feel to it which is so comfortable and summery. Unfortunately I have no idea what company makes it or where else you can buy it. Has anyone seen it online? If you find it I heartily recommend it for clothing.
UPDATE 3/22/09:
Lots of you have been emailing me asking how to make this shirt.
Here are my modifications for KwikSew 3222:
I cut 1/2 inch out of the neckline before attaching the placket. Here's my tutorial on how to make the placket:
YOU TOO CAN MAKE YOUR VERY OWN PLACKET
Then you add the flour collar; I followed the tutorial as is except I added a couple extra pleats so I added a few more inches to the length.
However I will note the tutorial gets a little tricky at the end:
The part that was confusing to me was that the end when you're supposed to attach it, she suggests attaching the bottom of the collar to the garment, right sides together. I actually prefer to have the right side of the top of the collar facing the wrong side of the shirt neckline with the raw edges lined up. It seems wrong because the collar looks like it's going to be on the inside of the shirt. You sew that, then press the seam towards the collar and turn the collar right-side out so the collar goes up-out-and over the raw edges you just sewed and do basting on the right side of the underside of the collar (to close it all up), and the final stitching on the right side of the top of the collar (then pull your basting). That way your rough edges are underneath the collar instead of facing your neck where they might be (gasp!) seen.
Anyway, it sounds confusing reading it here but when you actually do it, maybe it will make more sense.
The last thing I did is I cut my sleeve with the straight edge on the fold so that I wouldn't have to hem it (so the underside of the sleeve looks just like the top side) and just sewed it on as a double layer. I also cut the sleeve a little wider so I could give it a couple of pleats along the top.
Happy Sewing!
