Guest Blogger: KellyLeaSews' Maternity Top Tutorials
I know many of you couldn't help but notice the amazing maternity tops made by Kelly in this years's Spring Top Week competition. Her green maternity top was one of the Top 60 finalists and earned a ton of votes! Since I've been doing alot of baby posts around here lately I decided to invite her over to show us how she modified the Spring Ruffle Top (and the Mendocino Sundress) for maternity wear. Welcome Kelly!
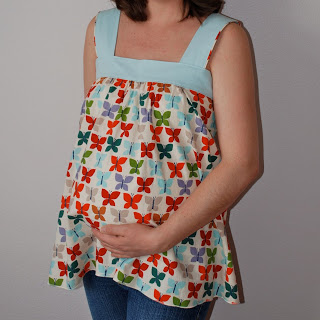
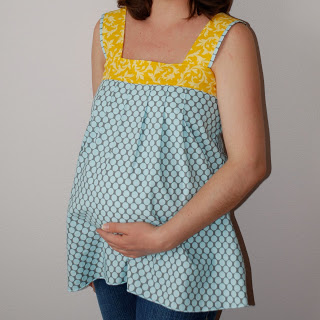 I made these first two tops using Rae's awesome Spring Ruffle Top tutorial. I didn't modify the width at all, I think you will find that there is plenty of room without making any changes. When I hemmed it I left the front at the original length (20") and cut the back about an inch and a half shorter. That way, when I put it on and my belly pushes it out, it all still falls at about the same length. To cut the length, I folded the shirt in half with the side seams together and made a mark 1 1/2" up from the bottom in the center of the back panel, then I sketched a line with my chalk from that mark, down to 5" past the side seam on the front panel. I cut it along that line and used a rolled hem on my serger to finish it off. Post-baby I plan to take it in on the sides as shown in Rae's tutorial, and even out the length.
 This one has some more modifications, but is still based on the same pattern. I thought gathers would make a better "belly bubble" and I think it worked well. There are instructions at the end of Rae's tutorial for making gathers instead of pleats. The first thing I did was take out 3" from the width of the back piece so that it would lay better. From there I sewed the shirt just as instructed in Rae's tutorial, and then went to work on the bottom. (Make sure if you are finishing off the seam allowance on the sides that you don't cut any of it off yet, you will make a side vent where the bottom band ties later, and you will need the full 1/2" of fabric in the seam allowance on that side.)
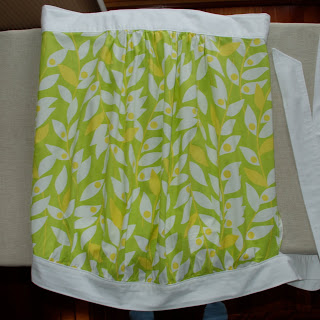 I left the front at the original length (20"), which seemed a little to long at the time but as my belly has gotten bigger it fits really well.
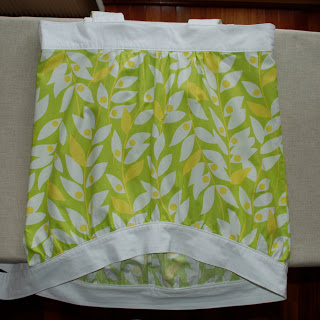 I took a lot off the back, about 6 1/2". Try it on before you cut it, and mark where you want the back to end, keeping in mind that the band will add another 2" to the length.
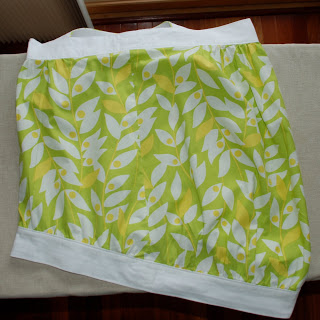 To cut the length, fold the shirt in half with the side seams together, then measure 6 1/2" (or your measurement) up from the bottom in the center of the back panel. Then sketch a line from that mark, down to a couple of inches from the center of the front panel. Make sure your line starts out sort of flat for the first couple of inches so that when you open the shirt back up you have a curved line in the back and not an inverted V.
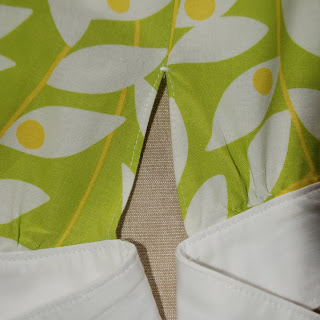 Next I made the little side vent where the bottom band ties. Open the side seam up 4" from the bottom, and fold the seam allowance in 1/4", then again 1/4" and press. Then top stitch about 1/8" away from the edge, and finish the top of the vent with a zigzag stitch set at 0 for the stitch length.To make the bottom band: measure around your hips where you want it to lay, and cut two lengths of fabric, each piece equal to 1/2 of your hip measurement plus an extra 24" to allow for bow tying cuteness. To make it the same width as the top band, cut it 5" wide. Sew the two pieces together at the ends using a 1/2" seam, and press the seam allowance open. Fold the band in half lengthwise (wrong sides together) and cut the ends at an angle, then sew them together for the first 24" only on each end, using a 3/8" seam allowance. Next turn it right side out and press, folding one side of the unsewn part of the band 1/4" toward the inside. Then gather the front and back panels of the shirt so that they are each equal to 1/2 of your hip measurement, starting the gathers 2" from the side seam and ending 2" from the opposite side seam. Attach the band the same way as the top chest band (step 7 in Rae's tutorial), matching the side seam of the band with the side seam of the shirt (the shirt should fit in the "pocket" that was made by sewing the first 24" of the band together- if not, adjust the gathering that you did on the shirt). As I attached the band, I continued sewing to top stitch all the way around the band; I did the same with the top chest band.I am still deciding how I will modify this one after the baby comes, when I cut it off to even out the length it will be pretty short. I think I will add either just a plain white band or ruffle to make it longer, and not fitted at the bottom.
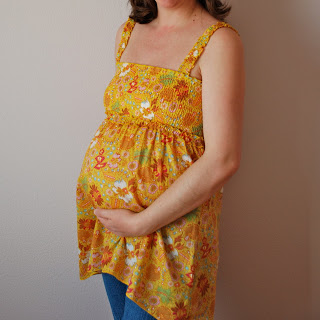 This one is my favorite, it is super comfortable and I find myself wearing it a lot. I used the Heather Ross Mendocino Sundress pattern, available for free on her website. The only thing I modified was the length; I have made three of these- one the original pattern length, one knee length and this top and I like them all. There is enough room for a rather large belly, I am 30 weeks as of this writing and still have room to grow. I will continue to wear this one long after the baby comes!So that's it! I hope this is helpful to the expecting moms out there. If you have any questions I would be happy to answer them, just leave them in the comments for this post.Kelly was 30 weeks pregnant when she wrote this; however, it's been about a month since I asked her to guestie and she's getting closer to the end of her pregnancy. You can leave comments or questions for Kelly and she will answer as time allows.Thanks so much Kelly! I hope you moms who are expecting will be able to make some cute summer tops of your own!


