
How to lengthen the Citrine pattern


One of the first variations on the Citrine pattern that I attempted was a lengthened version - the purple waffle one shown in this post. I started making prototypes for this cardigan pattern back in 2020; originally my plan was that it would be a single-view pattern, with long and short length options. However, I eventually decided that I really wanted add a more voluminous, gathered variation (what is now “view b”) and figured there were other long cardigan patterns out there to suit people’s taste. I also decided it would be simple enough to show you how to add length in a tutorial post. THIS POST.
HOW TO LENGTHEN THE CITRINE PATTERN

STEP 1. Trace your pattern pIECES
Trace your pattern pieces for the front (piece # 1 - both the darted and non darted front are shown here - you would pick one), and back (#2), and neckband (#4). (See this post: How to Trace a Pattern)
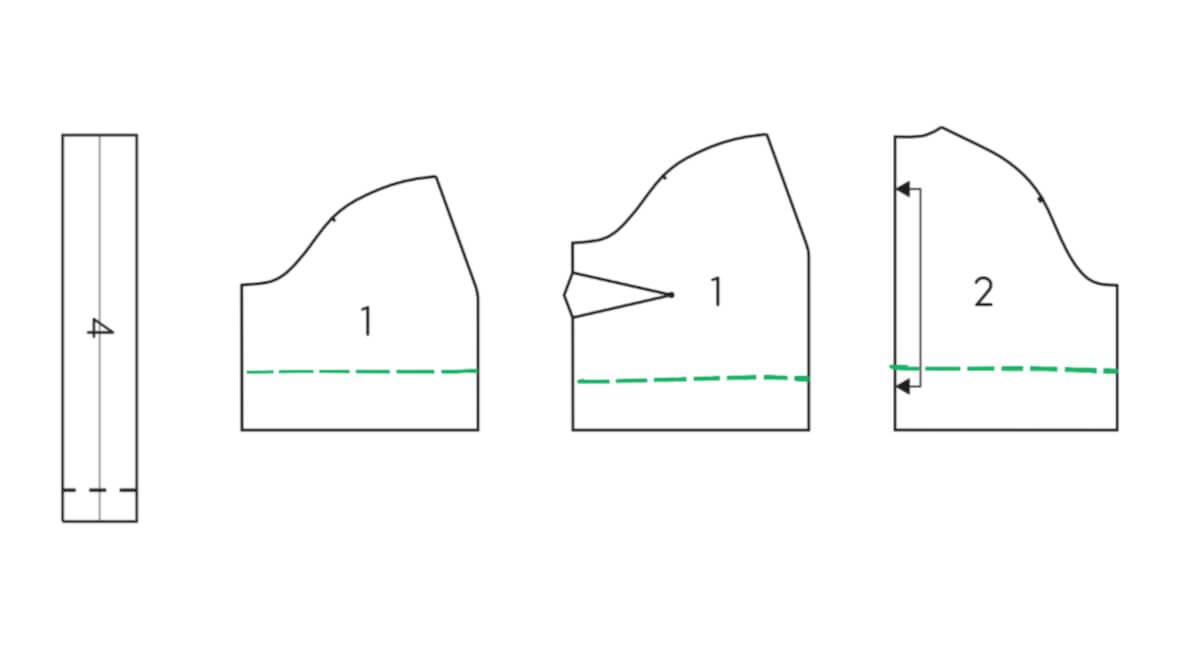
STEP 2. Cut pattern pieces horizontally
Using a ruler, draw a horizontal line (green dashed line in the diagram above) across your front and back pieces, perpendicular to the grain arrow. Cut the pattern pieces along those lines.

STEP 3. Add length to pattern pieces
Extend the pattern pieces by the amount you want to lengthen the cardigan; in this case I added 7” to the length of the pattern (scroll down for a Citrine that I added even more length to). This is shown in red on the diagrams above.
Then - and this is important - extend the neckband pieces by the exact same amount.

STEP 4. (OPTIONAL) Add width at the hip
I only really recommend this if you want to add buttons to close up the cardigan, but especially if your hip measurement puts you in a larger size than your full chest; since the pattern was designed to hit at the high hip, it really doesn’t curve outward at all to accommodate the hip. To fix this, I’d suggest adding a bit of width at the hips, maybe 1-2” on each piece (shown in yellow in the diagram above).
This isn’t shown, but I’d also suggest that you curve your line a bit at the bottom so that the corner is still true (perpendicular) at the hem; in other words, where the side and hem edges meet, you want that to be 90 degrees so that you don’t get a weird point at the bottom of the side seam.
STEP 5. Cut out your pieces and sew your cardigan
The next step is just to go ahead and construct your cardigan as the pattern instructs.

Other notes on the purple version:
the fabric I used is this awesome organic waffle knit + matching 2x1 organic rib knit from Isee Fabric - this color that I bought a couple years ago (“Wisteria”) is no longer available but I think that the color “Petal” is pretty close.
Eagle-eyed readers will notice that I also used a narrower binding for this version of the cardigan. I cut the widths of the neckband and waist binding pieces narrower (I think I used 3.5” wide so the resulting folded band is just over 1” wide).

BONUS ROUND: ADD POCKETS!
OK! So the last thing I want to mention today is that of course if the cardigan is lengthend, you want it to have pockets, right? Here’s a version I made that has even more length and has pockets:


To add pockets, I used my handy pocket tutorial: SUPER FUN PATCH POCKET TRICK <-So easy!
Other notes on this version:
For this version, I used organic french loop terry and matching 2x1 organic rib knit - both are the color “copper”, again both from Isee Fabric (I purchased it myself - however, later they did send me free fabric that I made this version out of).
As with the purple version, I narrowed the binding again, but this time I added a little more length and just folded up and stitched the hem rather than adding binding along the bottom edge. See this tutorial: How to Sew Beautiful Knit Hems for my tips on how to do this!

Ready to make one of your own? You can find the Citrine pattern - which is available in fourteen adult sizes up to max chest 66” - in my shop: